CHEETAH
Product Introduction
Designed for a single-head 3D printer, many interfaces are reserved for more features. Such as AC detection, filament detection, leveling with BL-touch or other sensors.
Features
-
Compact size: 101.5mm x 72mm,Compatible with the Creatlity ender 3 motherboard size
-
fully integrated all in one solution:
- STM32F103 MCU (Run Marlin 2.0 )
- CH340 for high speed USB serial connection
- (V1.1)4X TMC2209 stepper drivers, Support sensor-less homing
- (V1.2)4X TMC2208 stepper drivers, not support sensor-less homing
-
UNIVERSAL POWER:
- can be used with 7V-35V for motors / heated bed
- (V1.2)24V to 12V/2A DC-DC for fans
- integrated high precision power regulators (DC/DC): 5V 1A Max and 3.3V 600mA Max LDO
-
Onboard TF card socket
-
EXP1 for 12864 display panel (Creality 12864 panel or FYSETC Generic12864)
-
Onboard RGB control (V1.2 have no RGB control)
-
RGB control and fan control 12V/24V optional (Requires 24V to 12V module)
-
PCB:
- High quality, High temperature FR4-TG130 PCB
- Gold ENIG finishing
Application
- 3D printer
- CNC Device
- Other similar machines
Hardware Reasources
| Board Name | Cheetah |
|---|---|
| License | GPL V2.0 |
| Latest Version | V1.0 |
| Extruders | 1 |
| Fixed Fans | 2 Max |
| Controlled Fans | 1 Max |
| Heaters | 1 Max |
| Endstops | 3 Max |
| Temp sens | 2 Max |
| I2C | 1 |
| SWD | 1 |
| Serial port chip | CH340 |
| CPU | STM32F103 |
| CPU Speed ( MHz ) | 72 Mhz |
| Stepper driver | 4X TMC2209 (V1.2 = 2208) |
| Stepper driver Type | Onboard |
| Input | 7-35 V 20A Max; |
| Output | BED OUT:10A Max ;Heater Out:5A Max |
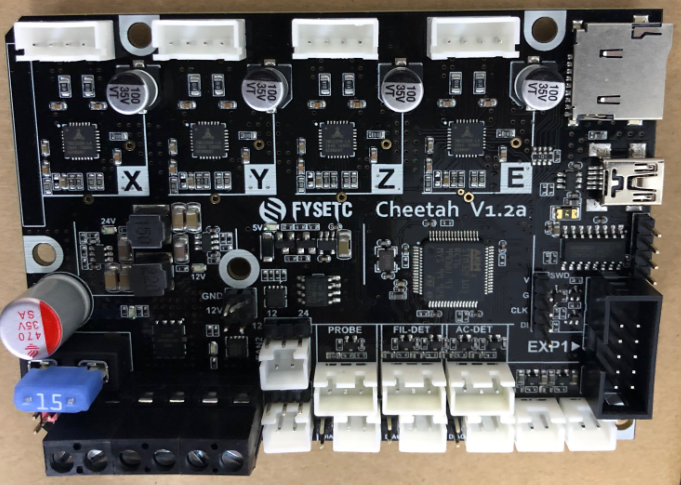
Connectors and jumpers define(V1.1)
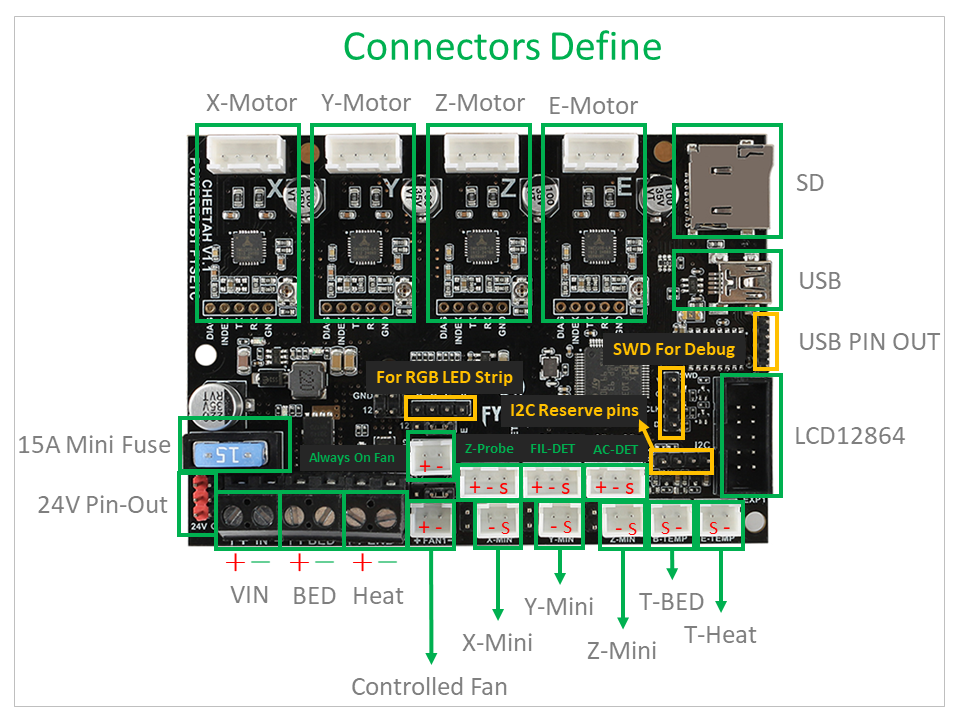
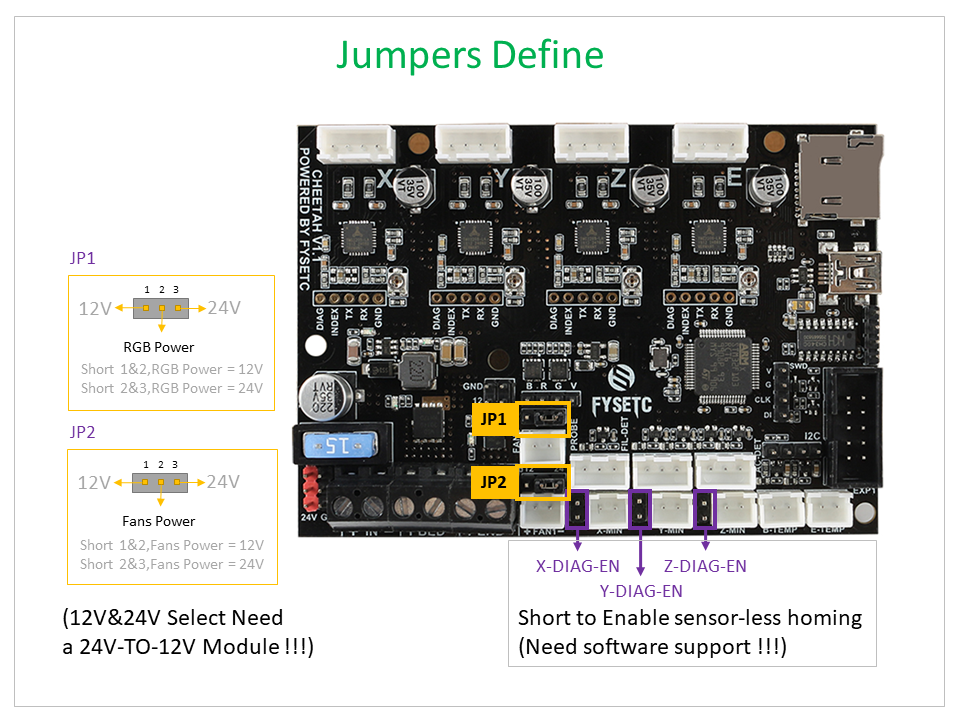
Connectors and jumpers define(V1.2)
Firmware
The FYSETC CHEETAH firmware is pre-config for ENDER3 machine, if you want to change the firmware or compile the code yourself , follow the steps.
Download Vscode + platformio
To compile the firmware , you need to install Visual Studio Code and the platformio pulg-in.
Download firmware
You can download the firmware from
Cheetah V11 : https://github.com/FYSETC/Marlin-2.0.x-FYSETC/tree/CHEETAH/V11
Cheetah V12 : https://github.com/FYSETC/Marlin-2.0.x-FYSETC/tree/CHEETAH/V12
And if you want to know what we have changed , we recommend to use git to get the code .
Compile the firmware
Open Vscode and open platformio main page and click the "Open Project" button , and direct to the folder where you put your firmware.
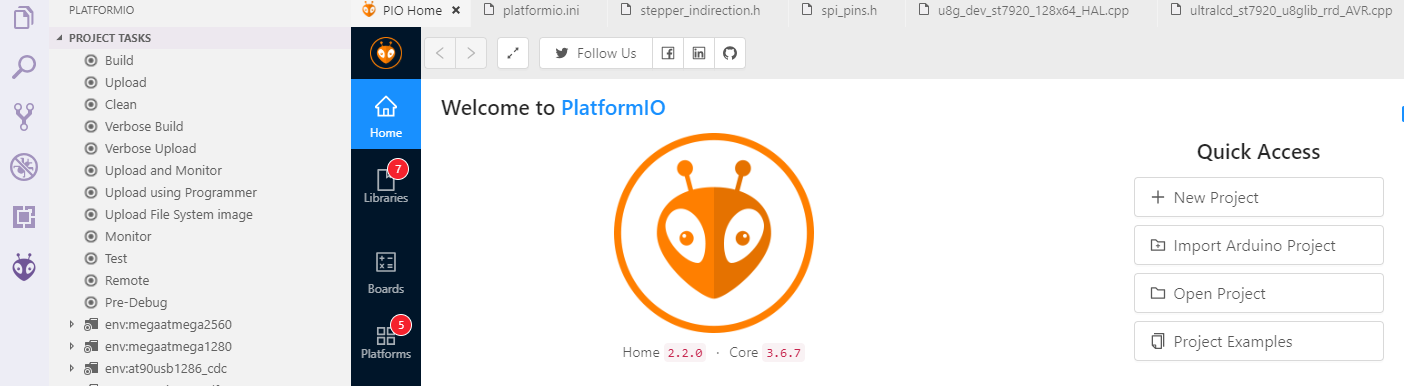
If everything goes fine , at the bottom you can see several buttons

Just click check mark to compile.
If you generate the hex file fail you may need to open vscode using Administrator Account .
Upload the firmware(windows,linux,Mac)
We provide several ways to upload the firmware .You can just click the upload button to upload the firmware or refer to the two methods below.
Upload the firmware(windows)
After compiling , you should see the firmware file "firmware.hex" in the folder FIRMWARE_LOCATE\Marlin\Marlin\.pio\build\STM32F103RC_fysetc\
Download the flash software in our github https://github.com/FYSETC/STM32Flasher
Power the board with power supply and connect the board to your PC with USB cable (This step should before you open the software)
Double the click "FlyMcu.exe" software to open it.
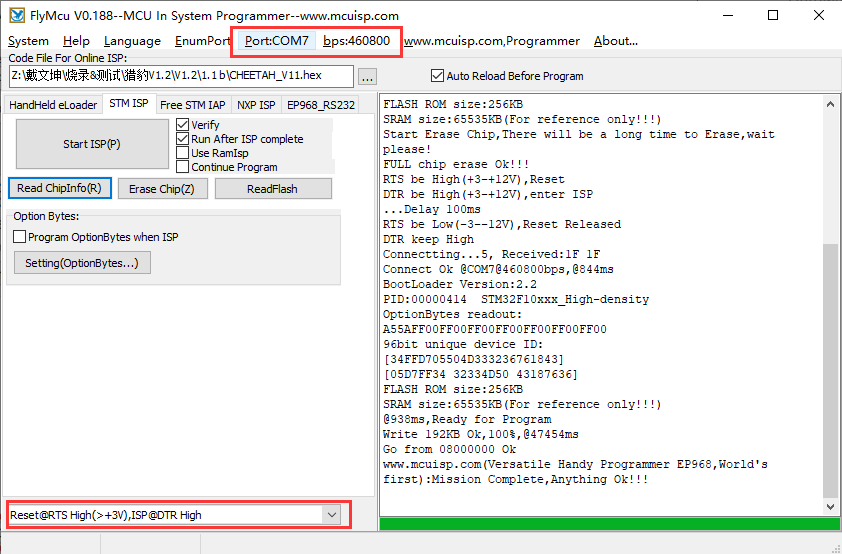
Select Reset@RTS High(>+3v),ISP @DTR High
Click "Port" to select the port of your USB
Select FIRMWARE_LOCATE\Marlin\Marlin\.pio\build\STM32F103RC_fysetc\firmware.hex.
At last , "Start ISP(p)" to upload the firmware.
Upload the firmware(linux)
Load usb driver
Delete the old version driver /lib/modules/$(uname -r)/kernel/drivers/usb/serial/ch341.ko
rm /lib/modules/$(uname -r)/kernel/drivers/usb/serial/ch341.koDownload the CH34x driver(linux version) from our github
https://github.com/FYSETC/CH340-Driver
follow the readme.txt to make and load the driver .
If you want the driver load automatically every time your PC power up. You can copy the ch34x.ko file to
directory /lib/modules/$(uname -r)/kernel/drivers/usb/serial/ , and do
depmod Install stm32flash tool
First get the code
git clone https://git.code.sf.net/p/stm32flash/code stm32flash-codeThen follow the INSTALL file to install the software
Upload the firmware
Connect the motherboard with USB cable and your PC. And do
dmesgAnd you will get message like

the ttyUSB0 is the port to communicate with the motherboard.
And then go the the firmware.hex file location directory and do the follow command to upload the firmware
stm32flash -w firmware.hex -v -i rts,-dtr /dev/ttyUSB0Version:
V1.1:
- Initial version
V1.2a:
- Change 2209 to 2208 and support 2208 UART mode
- Add a controlled fan for hotend
- And a 24 to 12V/2A Circuit for fans and mosfets
- Add mosfet driver chip
- Remove the RGB circuit and I2C pins
- Change the 4P pin header(1.1 is USB pinout) to UART1
- Fixed USB voltage reflow to PSU issue
V1.2b:
- Fix some silks mark
- Update MOSFET drive circuit
FAQ:
1.Why use USB-TO-UART chip for USB?
We just want to give you a convenient way to update the firmware without having to think about which bootloader to use and how to jumper BOOT0&BOOT1.
Also, if your board is already installed in the machine, the jumper setting is more inconvenient for you.
So, by adding a chip that can solve the problem, why not do it?
2.Why does the USB power flow back to the PSU?
At the time of design, we thought that plugging in the USB is just to update the firmware, and at other times you will use the SD card for printing. Even if you use USB printing, it should be a short-time debugging.
Even, we found that most of the 2560 boards did the same, and nothing went wrong. This should be a way of testing over time.
Until TH3D promotes this problem in the whole world, I think this will cause confusion for many people, so I will solve this problem whether or not it will cause problems, and it was already solved on the 1.2a version.
3.The direction of the encoder is wrong?
First of all, this is not a hardware problem, we can adjust it through software, and it is very easy.
Secondly, there is no fixed standard in this direction, and different people may not like the same.
Finally, we have changed to the most favorite way, if you want to reverse, you can also set the firmware yourself.
Note: In fact, our price is only the price of a hardware platform, we have never calculated the value of software, we think that as one of the contributors and users of marlin, we should follow the spirit of open source, make more people easier Get the convenience of open source. Instead of selling it with open source resources.
4.The screen displays garbled characters?
First of all, we should know that low-voltage signals are easily interfered, so we should try to avoid the screen line and the high-voltage and high-current lines being too close.
In addition, our people usually have static electricity on their hands, and directly touch some electronic components, which may also affect normal signal transmission.
So if it is just an accidental phenomenon and it will disappear after re-power, then don't worry.
If it has been there, please contact us and we will deal with it according to the specific situation!
5.Y-motor got very hot
Actually there is an inappropriate firmware configuration.
You need to change
#define CHOPPER_TIMING CHOPPER_DEFAULT_12Vto
#define CHOPPER_TIMING CHOPPER_DEFAULT_24V6.Can't save config to eeprom
This is a firmware issue that has been fixed so far, you can fix it by upgrading the firmware.
For new firmware,the default config is not for cheetah board anymore as we have other boards to release and the need to build the firmware, you need to change default_envs to fysetc_STM32F1 in platformio.ini file and replace the configuration.h and configuration_adv.h file with FYSETC example config.
We will continue to update, please look forward to it!*
Tech Support
Please submit any technical issue into our Discord