SB CAN Setup Guide
1. Getting Started
The latest release of the Fysetc Voron 2.4 Pro Kit comes with the Spider V3 and a SB CAN Toolhead Board. This guide will walk you through the setup process of the CAN network. The Spider has a built in CAN transceiver, so we need to flash it without the need of an additional CAN adapter. Make sure to read everything in full first, and the follow these steps in order.
1.1 Creating a can0 file
The can0 file configures the speed at which the CAN network will run at. Follow these steps to create this file.
- Open the SSH terminal, and run
sudo nano /etc/network/interfaces.d/can0 - In the blank editor, copy and paste the following:
allow-hotplug can0
iface can0 can static
  bitrate 1000000
up ip link set can0 txqueuelen 1024- Press Control+X to save the file, and confirm if prompted.
- Run
sudo rebootand wait for the pi to reboot and make the changes. Now that we have the can0 file, the next step is the flash the Spider board.
2. Spider V3 Flashing
2.1 Put Spider in DFU mode
In order to flash the STMF446 chip in the Spider board, we need to put it in DFU mode. DFU mode will allow the board to accept new firmware that we flash to it.
Button Method
- While making sure that the board is powered on, hold down the BTO button on the side of the board
- While holding down the BTO button, press the RST (reset) button that is right next to the BTO button 5 times quickly.
- You should see all the lights on the Spider light up. This means that the board is now sitting in DFU mode
- Verify that the operation succeeded by running
lsusbin the SSH terminal. You should see the following:

There is no point in continuing if you do not see the desired result above. Firmware flash will not work if the board is not sitting in DFU mode. If you are not successful, repeat the procedure again or try the next method.
Jumper Cap Method
- Power off the board completely
- Install a jumper between 3.3 and BT0 on the blue pins
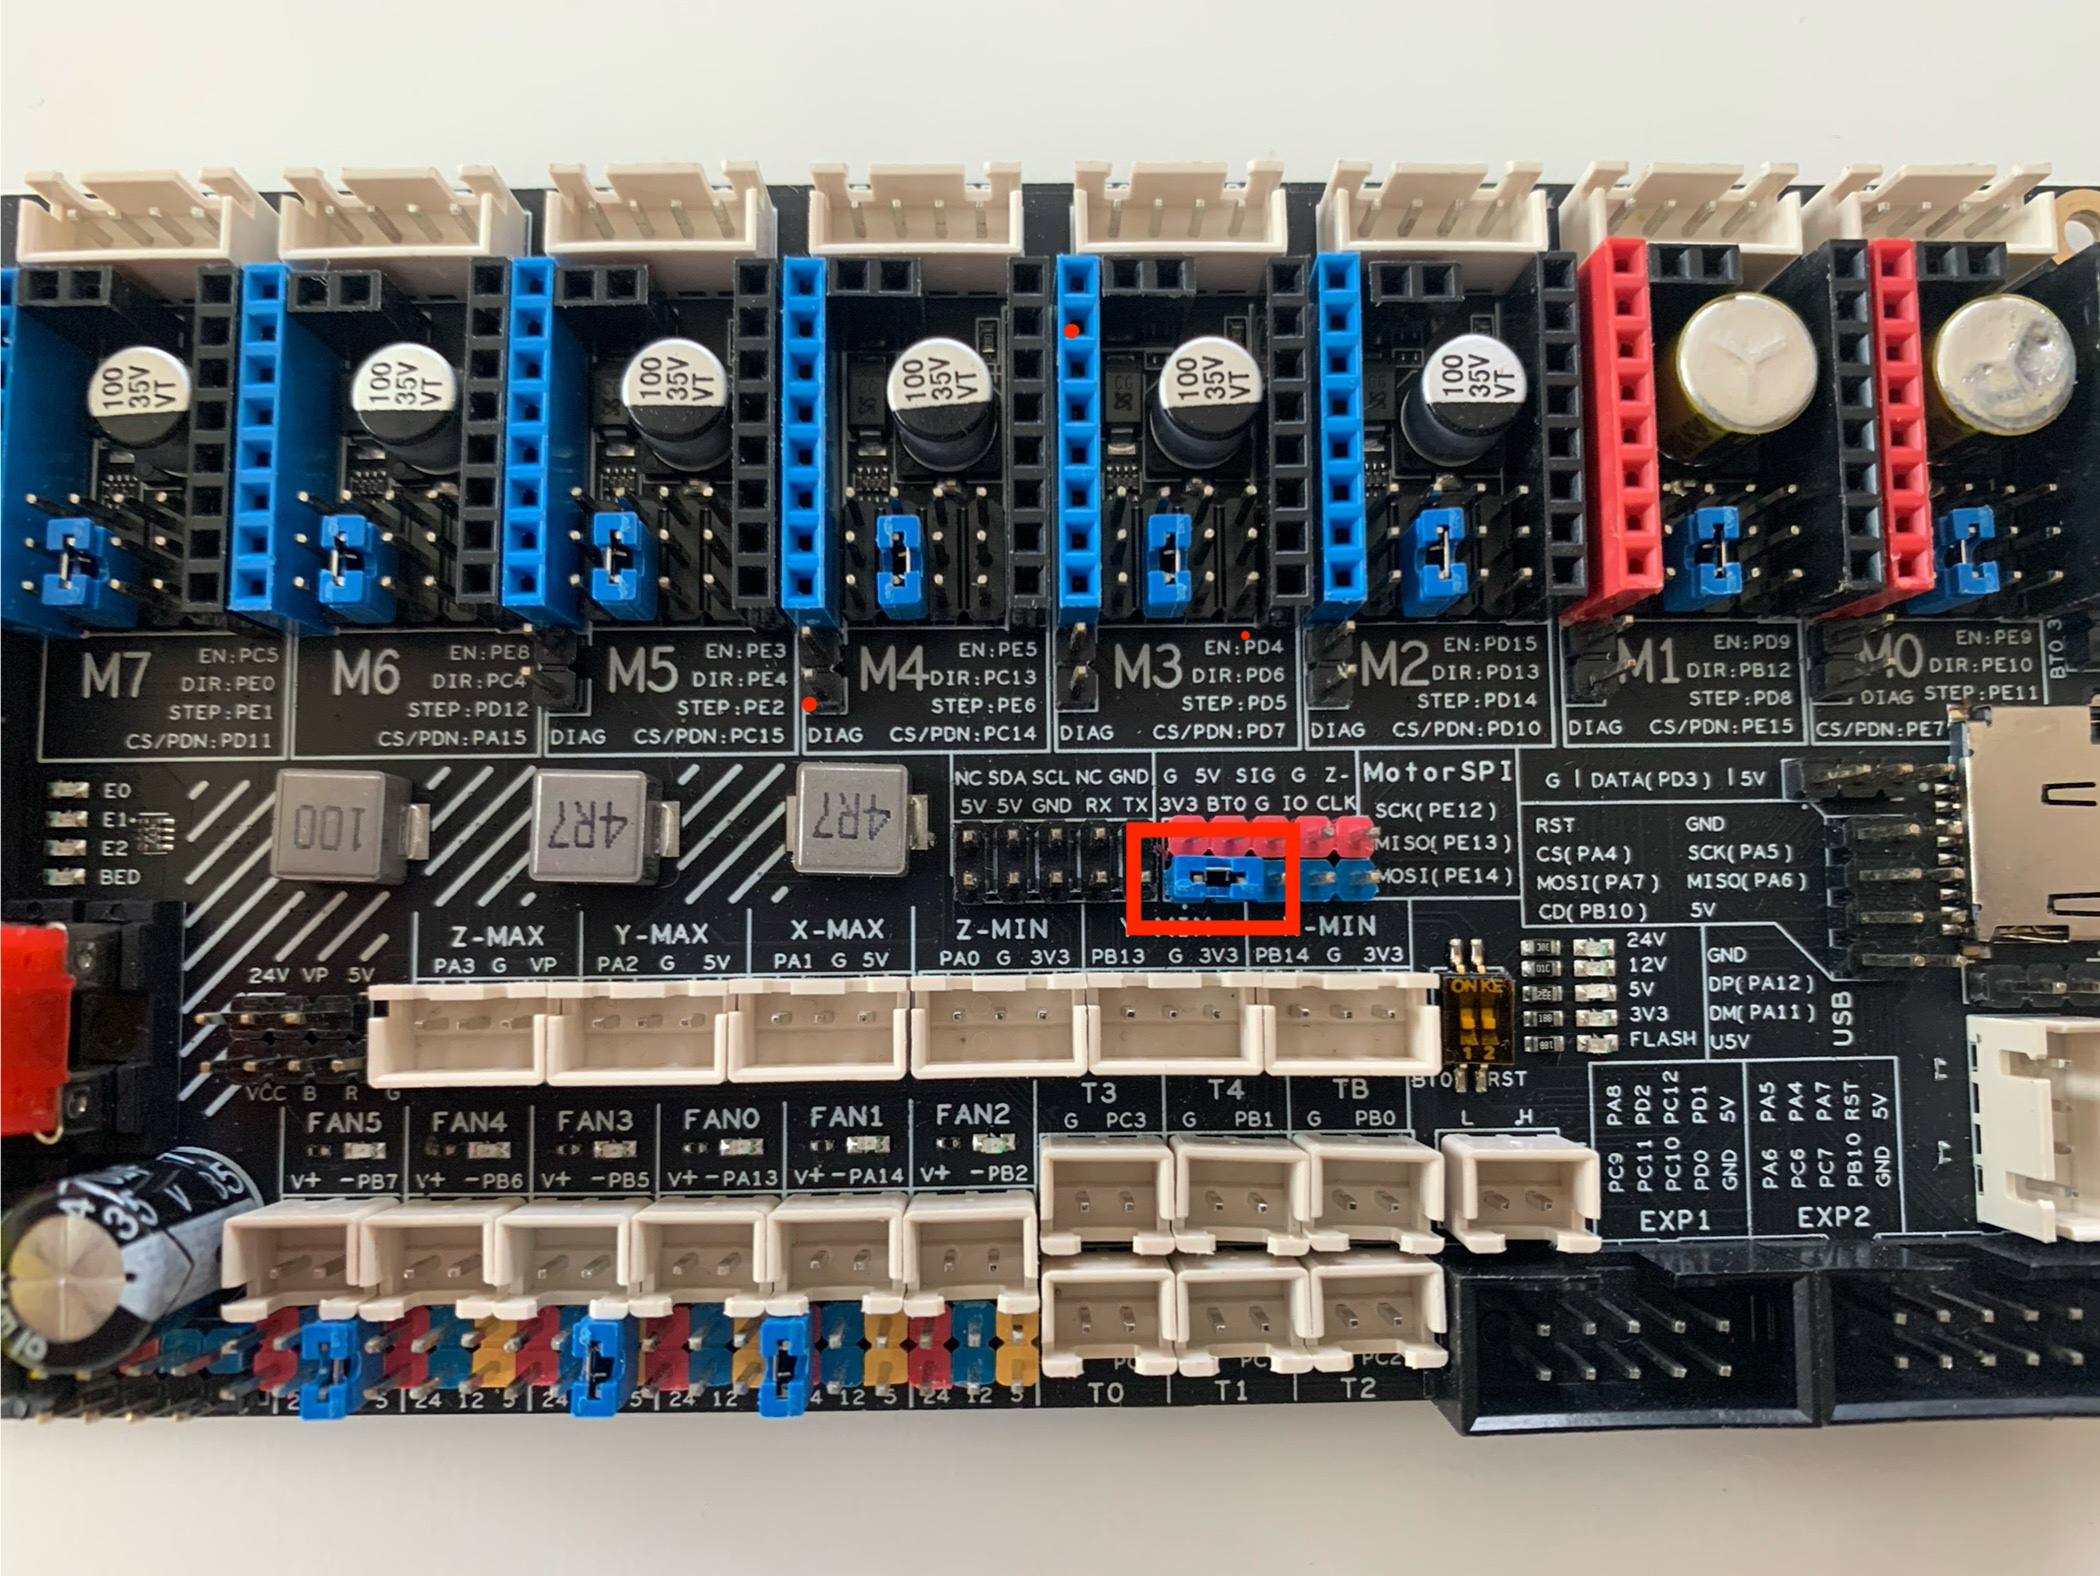
- Power the board back on, and you should see all the lights on.
- Verify that the operation succeeded by running
lsusbin the SSH terminal. You should see the following:
There is no point in continuing if you do not see the desired result above. Firmware flash will not work if the board is not sitting in DFU mode. If you are not successful, repeat the procedure again or send a message on Discord for help.
2.2 Make the Firmware Image for the Spider
Now that the Spider is in DFU mode, we can flash some firmware to it.
- In the SSH terminal, run
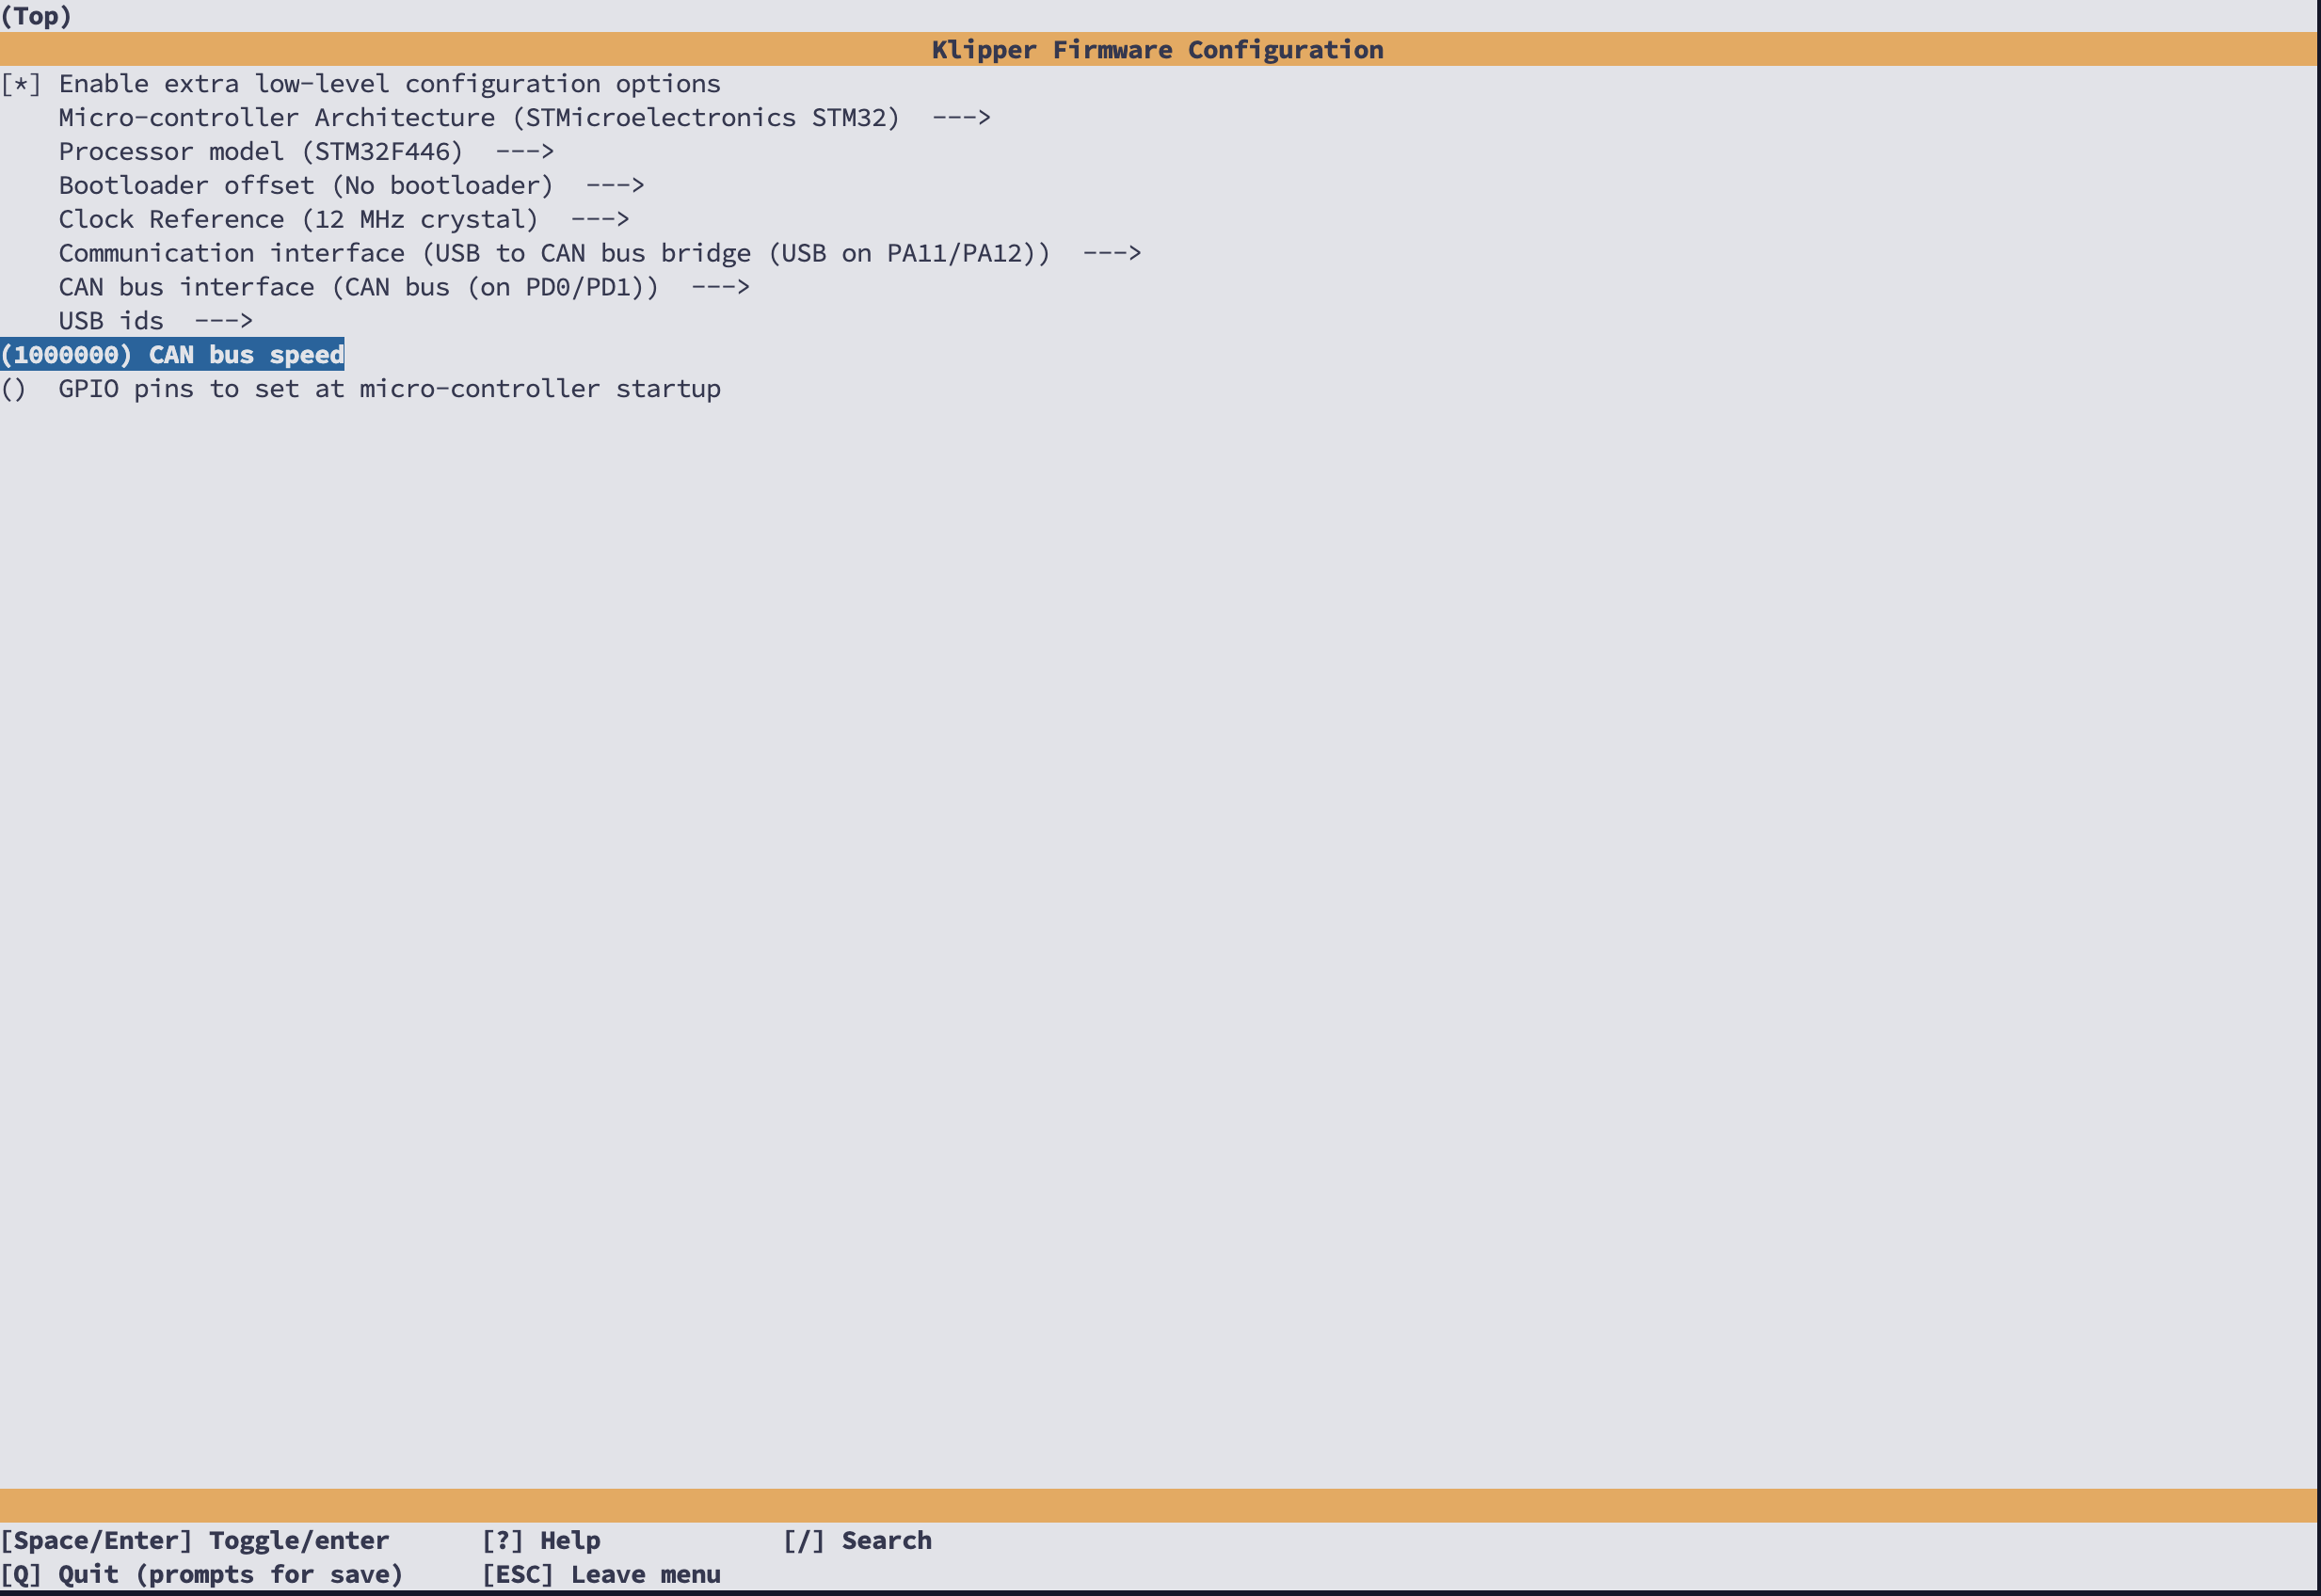
cd klipperto change into the Klipper directory. - Run
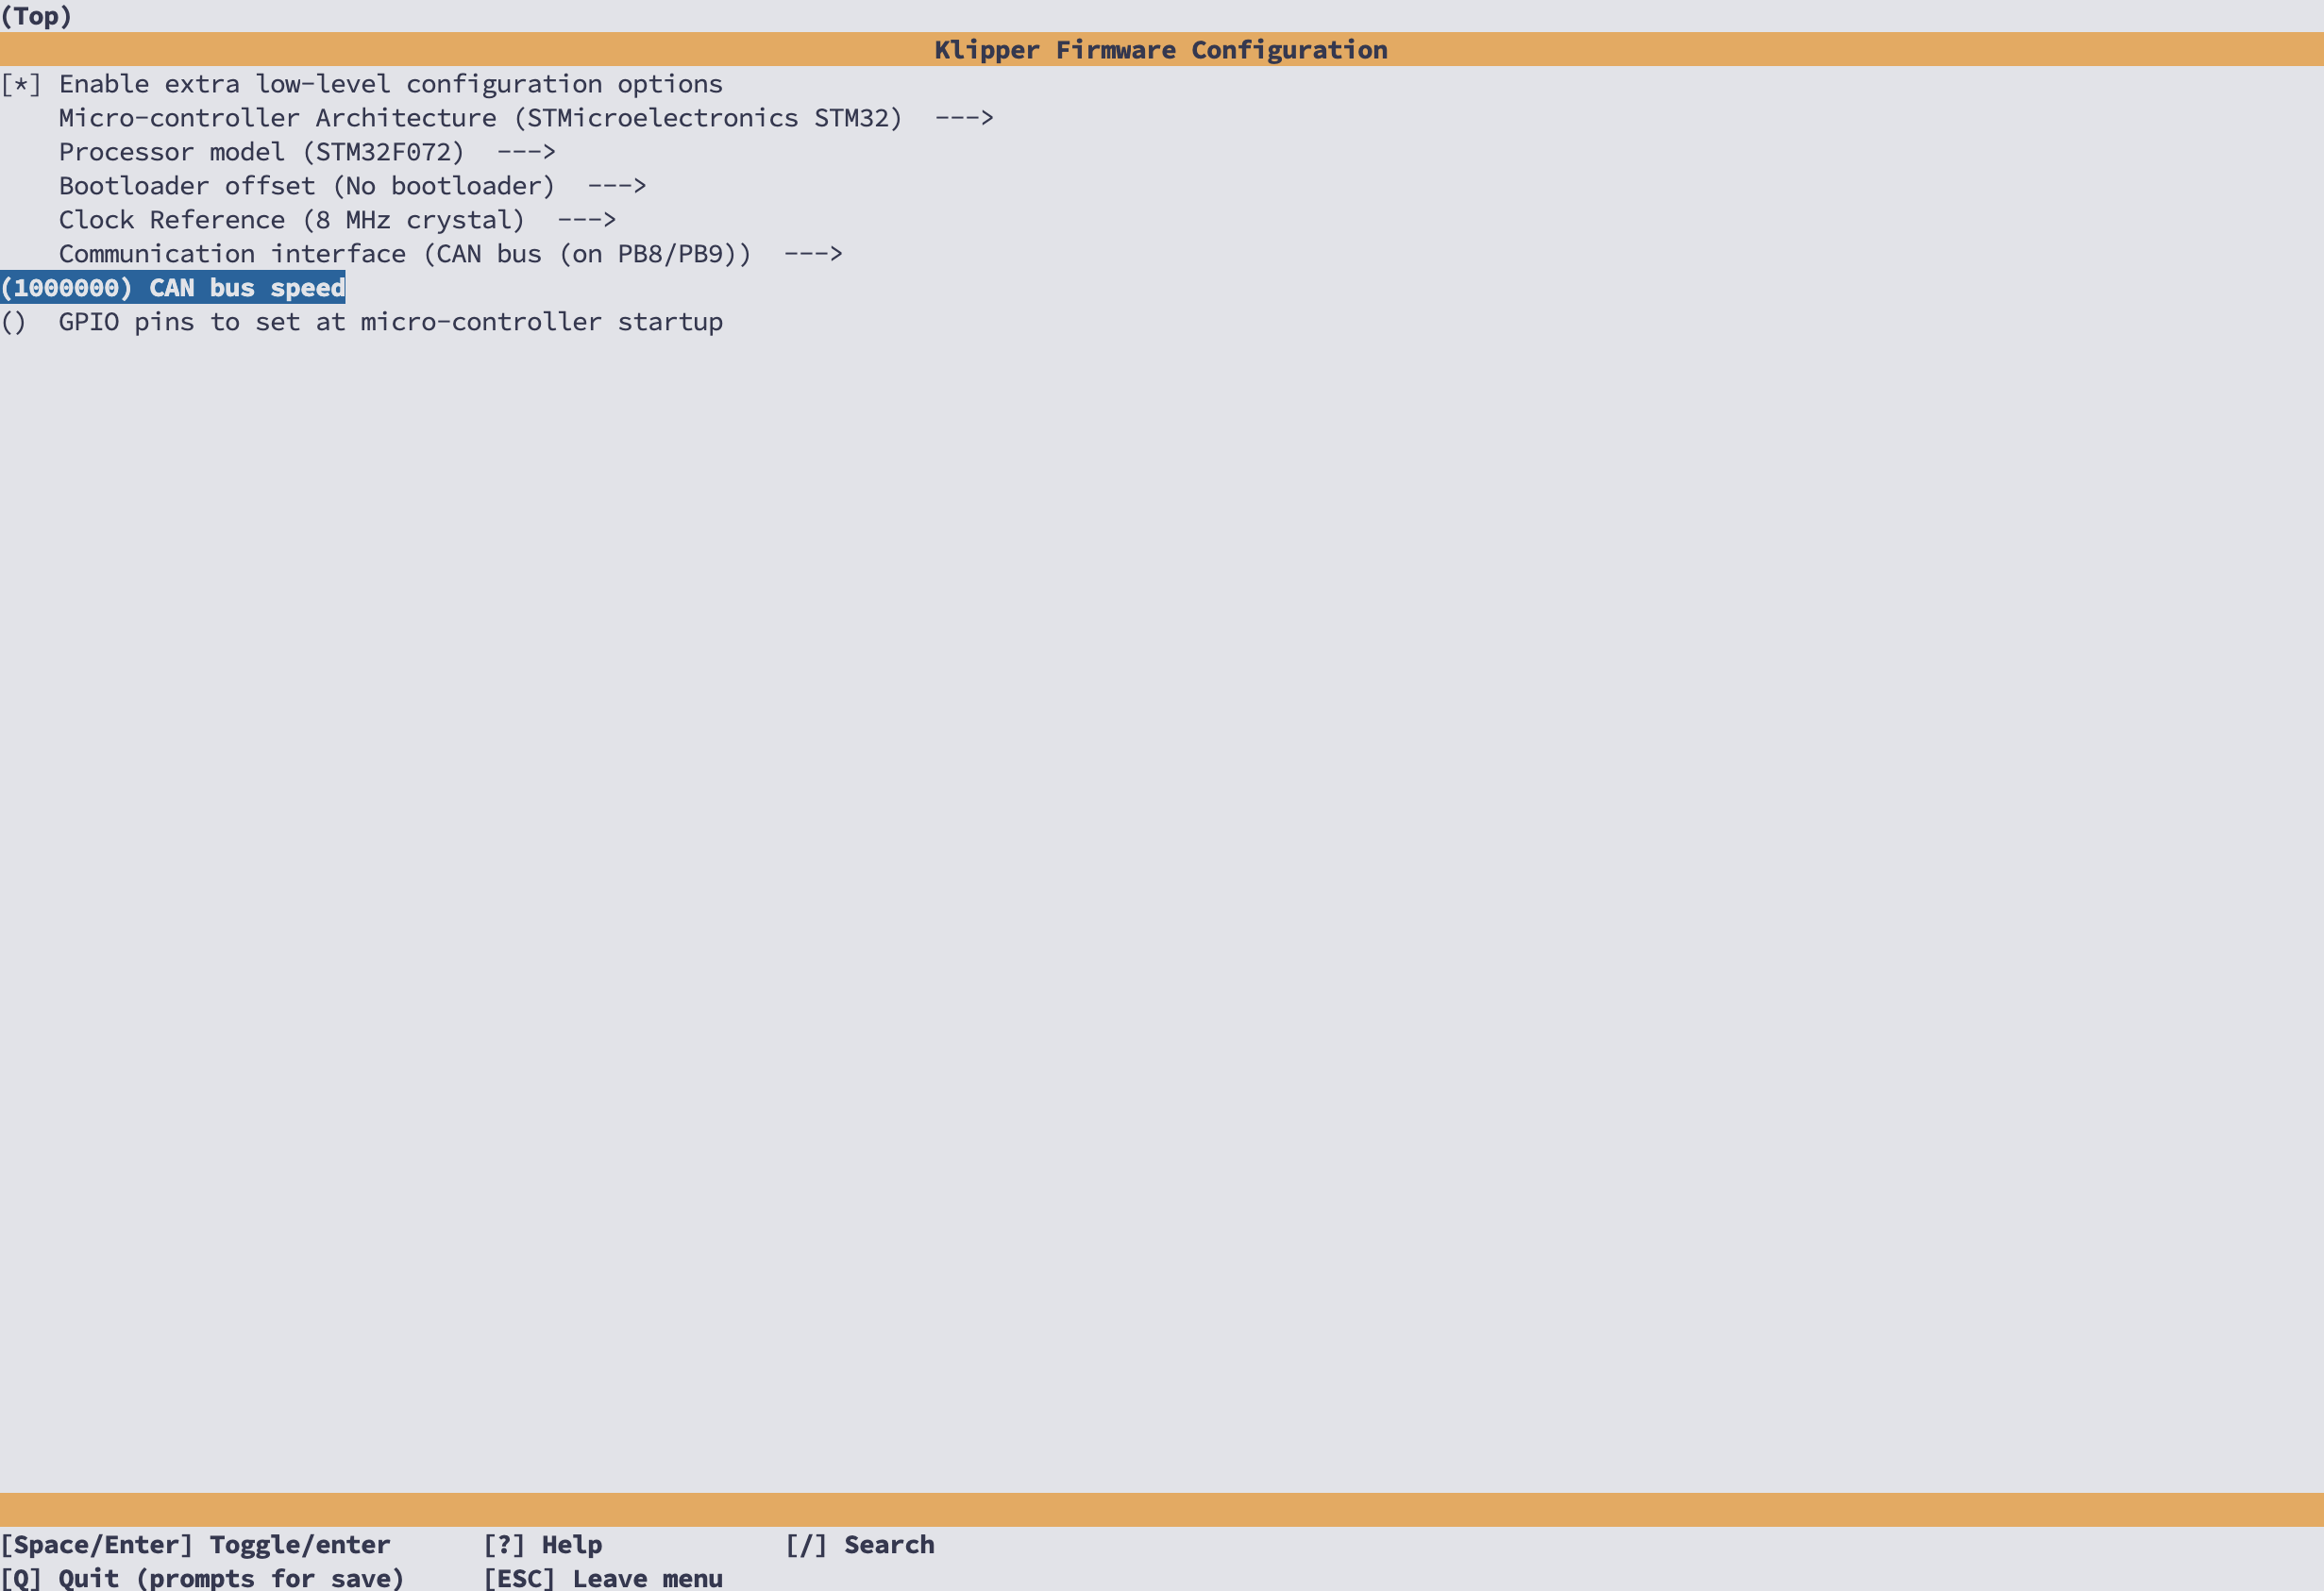
make menuconfigto open the Klipper Firmware Configuration portal - Change the settings to be exactly as shown in the image. Use your arrow keys and the enter button to navigate and select the correct options. Doublecheck that the options you selected match this image. It will not work if you do not have the correct options selected.
- Press
qto exit, and then pressywhen prompted to save. You should be back into the normal ssh terminal now. - Run
make flash FLASH_DEVICE=0483:df11to build and flash the firmware image to the Spider. If your board is not in DFU, this will not work. - As long as it says "File downloaded successfully", the flashing process worked. Do not worry if it gives a "Invalid DFU suffix signature" error.
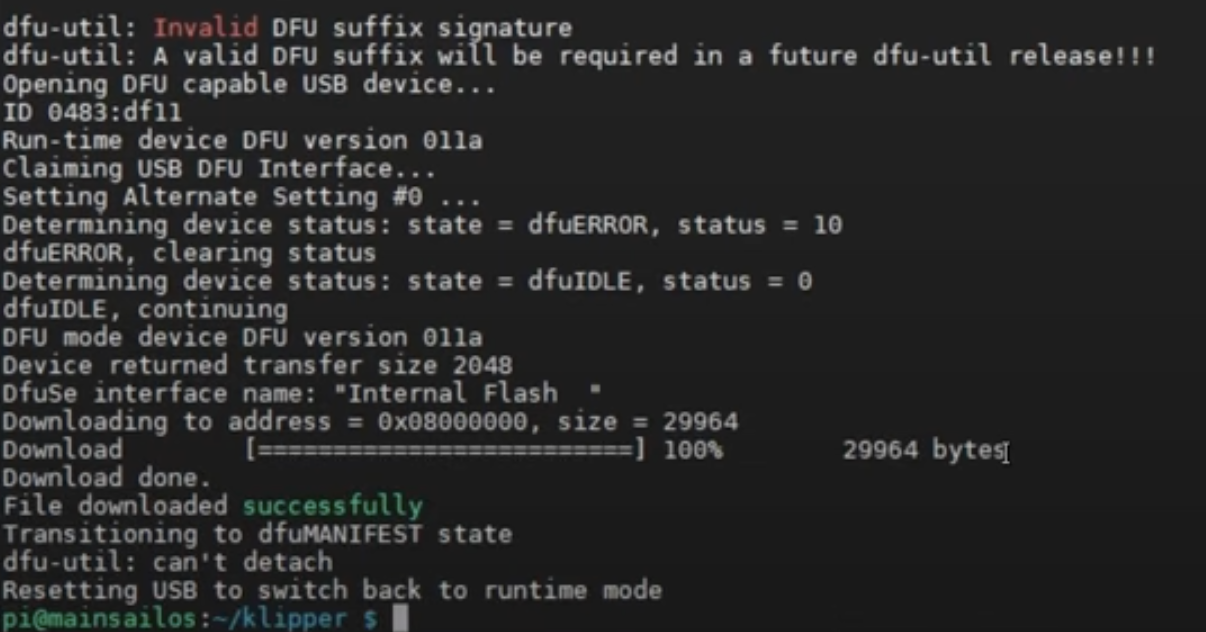
This is an example of a successful flash. Note the "File downloaded successfully"
Verify the Flashed Firmware
- If you used a jumper to get into DFU, power the board off and remove the jumper. Then power the board back up for the next steps. The Spider board should no longer be in DFU mode.
- Run
lsusbin the SSH terminal. - Make sure that you see an "OpenMoko" or "Geschwister Schneider bus device
Bus 001 Device 006: ID 1d50:606f OpenMoko, Inc.or
Bus 001 Device 006: ID 1d50:606f OpenMoko, Inc. Geschwister Schneider CAN adapter
2.3 Get Spider's UUID
Klipper requires a CANBUS UUID for configuration instead of a traditional serial. Follow these steps to obtain it.
- In SSH, run
~/klippy-env/bin/python ~/klipper/scripts/canbus_query.py can0 - You should see something like this:

The UUID is different for every Spider. Copy and paste your unique UUID in a notepad, and label it for the Spider. Later on we will get another one, so it is important to label it as the Spider's UUID.
Now that we have successfully flashed the Spider, we now need to do the same for the CAN Toolhead Board.
3. CAN Toolhead Board Flashing
- With the machine powered off, wire the provided CAN cable from the Spider to the CAN Toolhead board. Connect the 24v spade connectors to the power supply, and the JST to the Spider's CAN port. Plug in the other end into the CAN Toolhead board.
- Power on the printer, and then plug in the included USB cable from the Pi to the CAN Toolhead board while the printer is on.
3.1 Put CAN Toolhead Board in DFU mode
Just like how we put the Spider in DFU mode to flash it, we also need to put the CAN Toolhead Board in DFU mode. DFU mode will allow the board to accept firmware that we flash to it.
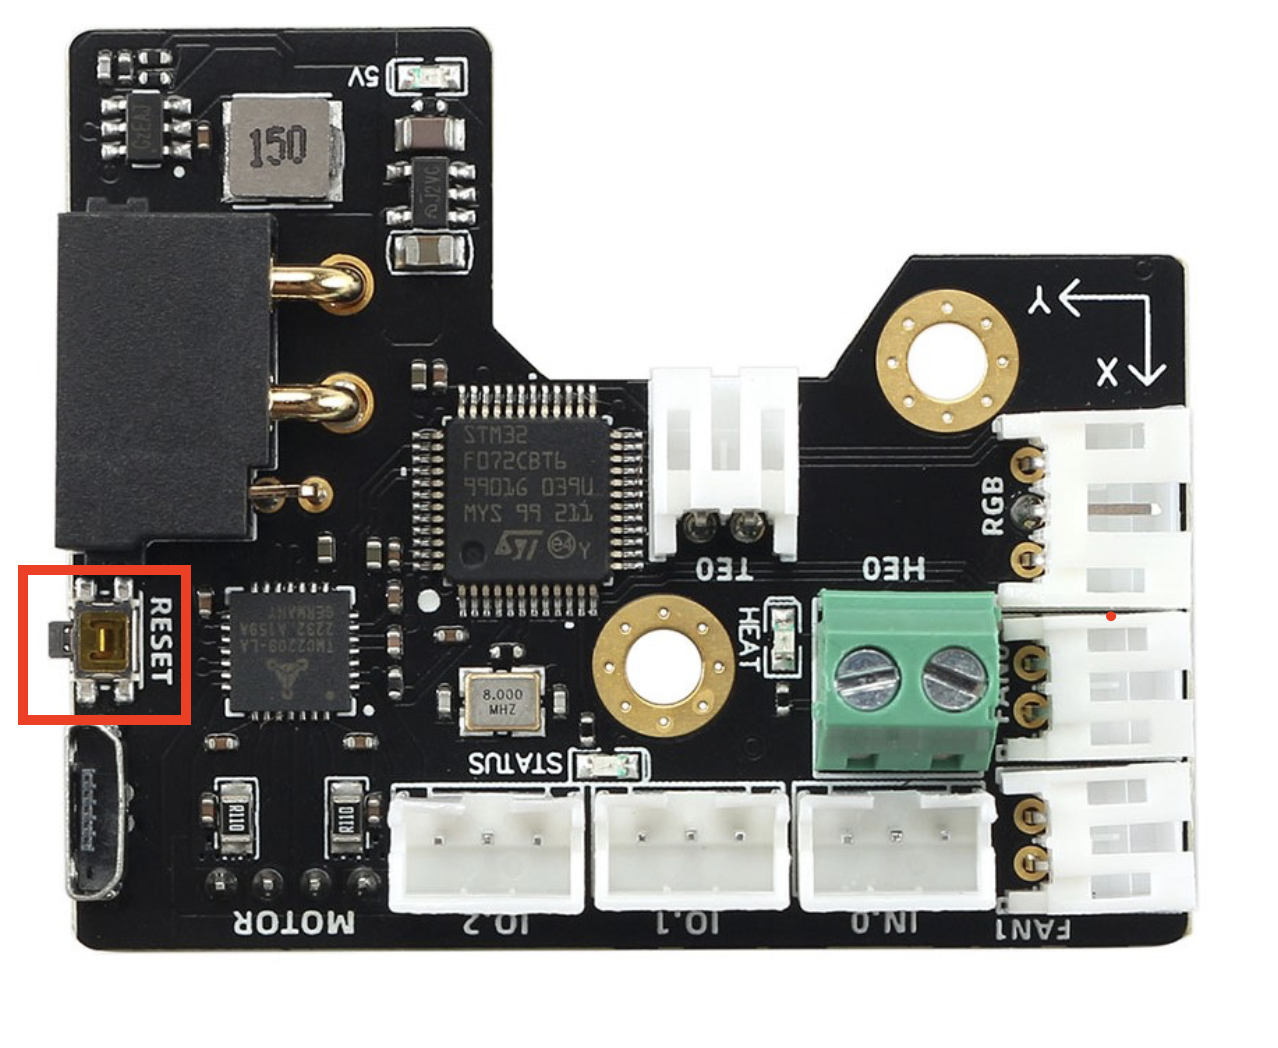
- Press the RST button on the board 3 times quickly.
- Verify that the operation succeeded by running
lsusbin the SSH terminal. You should see the following:
There is no point in continuing if you do not see the desired result above. Firmware flash will not work if the board is not sitting in DFU mode. If you are not successful, repeat the procedure again or leave a message on Discord for further assistance.
3.2 Make the Firmware Image for the CAN Toolhead boardoard
Now that the CAN Toolhead board is in DFU mode, we can flash some firmware to it.
- In the SSH terminal, run
cd klipperto change into the Klipper directory. - Run
make cleanto get rid of the old make we used for the Spider - Run
make menuconfigto open the Klipper Firmware Configuration portal - Change the settings to be exactly as shown in the image below. Doublecheck that the options you selected match this image. It will not work if you do not have the correct options selected.
- Press
qto exit, and then pressywhen prompted to save. You should be back into the normal ssh terminal now. - Run
make flash FLASH_DEVICE=0483:df11to build and flash the firmware image to the CAN Toolhead board. If your board is not in DFU, this will not work. - As long as it says "File downloaded successfully", the flashing process worked. Do not worry if it gives a "Invalid DFU suffix signature" error.
This is an example of a successful flash. Note the "File downloaded successfully"
- Remove the USB cable and press the Reset button 3 times to take the board out of DFU mode.
3.3 Get CAN Toolhead Board's UUID
Now that both boards are flashed with the correct firmware, we should have both UUIDs needed for Klipper.
- In SSH, run
~/klippy-env/bin/python ~/klipper/scripts/canbus_query.py can0 - You should see 2 UUIDS, something like this:

One of those UUIDs should be the Spider's, which you should have noted perviously. The other one is the CAN Toolhead board's UUID. Record and label it, as we will need to know which one is which.
4. Klipper printer.cfg Configuration
The configuration files are available already on the Fysetc Github. In your printer.cfg, you will need to add the UUIDs in the right places. Ask for more assistance in Discord if you are unsure on how to do this, as it differs deepening on the config you are using.
Contacts
QQ:1041794121
Facebook:https://www.facebook.com/groups/197476557529090
Discord:https://discord.gg/Fb6FdND4
E-mail:support@fysetc.com