
Catalyst.K_Tool_V1.1
Introduction
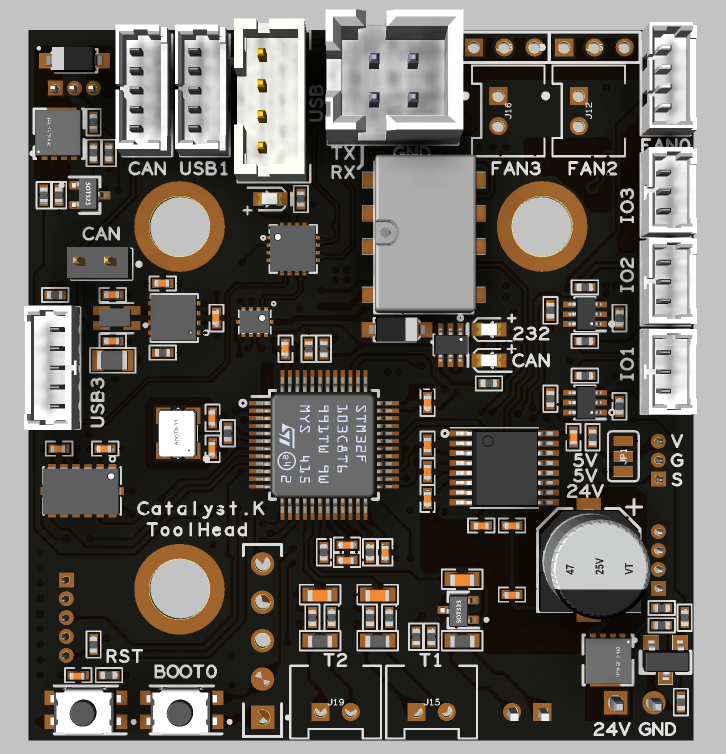
Catalyst.K ToolHead is a compact Klipper toolboard with a footprint of only 47 mm × 44 mm, designed to be mounted close to the printhead or extruder. It is powered by an STM32G431CBT6 32‑bit MCU and supports multiple communication modes, including USB and CAN / RS‑232, which can be switched via an on‑board physical button.
The board integrates a TMC2209 stepper motor driver, an ADXL345 3‑axis accelerometer, multiple fan and temperature inputs, as well as BL‑Touch and hotend heater control. This greatly simplifies toolhead wiring, reduces cable bundle weight on moving parts, and improves overall reliability and serviceability of the printer.
Features
- Compact toolboard design: 47 mm × 44 mm, mounted directly near the printhead or extruder to greatly simplify wiring.
- STM32G431 MCU: 32‑bit high‑performance controller optimized for Klipper multi‑MCU setups.
- Multiple communication modes: Supports USB, CAN, and RS‑232, switchable via on‑board button.
- On‑board USB hub: Provides 3× USB ports and 2× CAN port for easy host and expansion connectivity.
- Integrated TMC2209: On‑board 24V‑powered TMC2209 stepper driver for silent, precise extruder control.
- Built‑in ADXL345: On‑board 3‑axis accelerometer for Klipper input shaping and resonance testing.
- Stable power outputs: 24V input (max. 28V) with on‑board 5V@3A and 3.3V@0.8A rails.
- Rich IO and fan interfaces: 4 level‑shifted IO pins, 2 fan outputs (2×2‑wire with selectable 5V/24V, 1×3‑wire, 1×4‑wire).
- Complete sensing and actuator interfaces: 1 temperature inputs, 1× BL‑Touch connector, 1 hotend heater output up to 2.5A.
- Easy debugging: On‑board BOOT0 and RESET buttons for quick flashing and debugging.
Applications
- Used as a Klipper toolhead board for extruder/printhead control, providing local motor drive, temperature control, fan control, and acceleration measurement on the toolhead to greatly simplify the printer’s wiring.
- Suitable for mid‑ to high‑end FDM 3D printers that require integrated TMC2209, ADXL345, BL‑Touch, and multiple fan/temperature interfaces, both for upgrading existing machines and for new printer designs.
- Applicable in multi‑toolhead, multi‑nozzle, or remote‑extrusion setups as a distributed toolboard node, connected to the Klipper host system via CAN or USB /RS‑232 to build flexible multi‑MCU motion control architectures.
Hardware Specifications
| Item | Specification |
|---|---|
| Product name | Catalyst.K ToolHead |
| Board size | 47 mm × 44 mm |
| MCU | STM32G431CBT6, 32‑bit ARM Cortex‑M4 |
| Communication modes | USB, CAN, RS‑232 (selectable via on‑board button) |
| Input voltage | 24 V DC (max. 28 V) |
| On‑board power rails | 5 V @ 3 A, 3.3 V @ 0.8 A |
| Stepper driver | On‑board TMC2209, 24 V supply |
| Accelerometer | On‑board ADXL345 3‑axis accelerometer |
| Level‑shifted IO | 4× IO with voltage translators (selectable by pads) |
| Fan outputs | 2 digital fan outputs: 1×3‑wire, 1× 4‑wire |
| Temperature inputs | 1× temperature sensor inputs |
| Probe interface | 1× BL‑Touch connector |
| Heater output | 1× hotend heater output, up to 2.5 A |
| On‑board buttons | BOOT0 button, RESET button |
Physical Connections
Pin Out
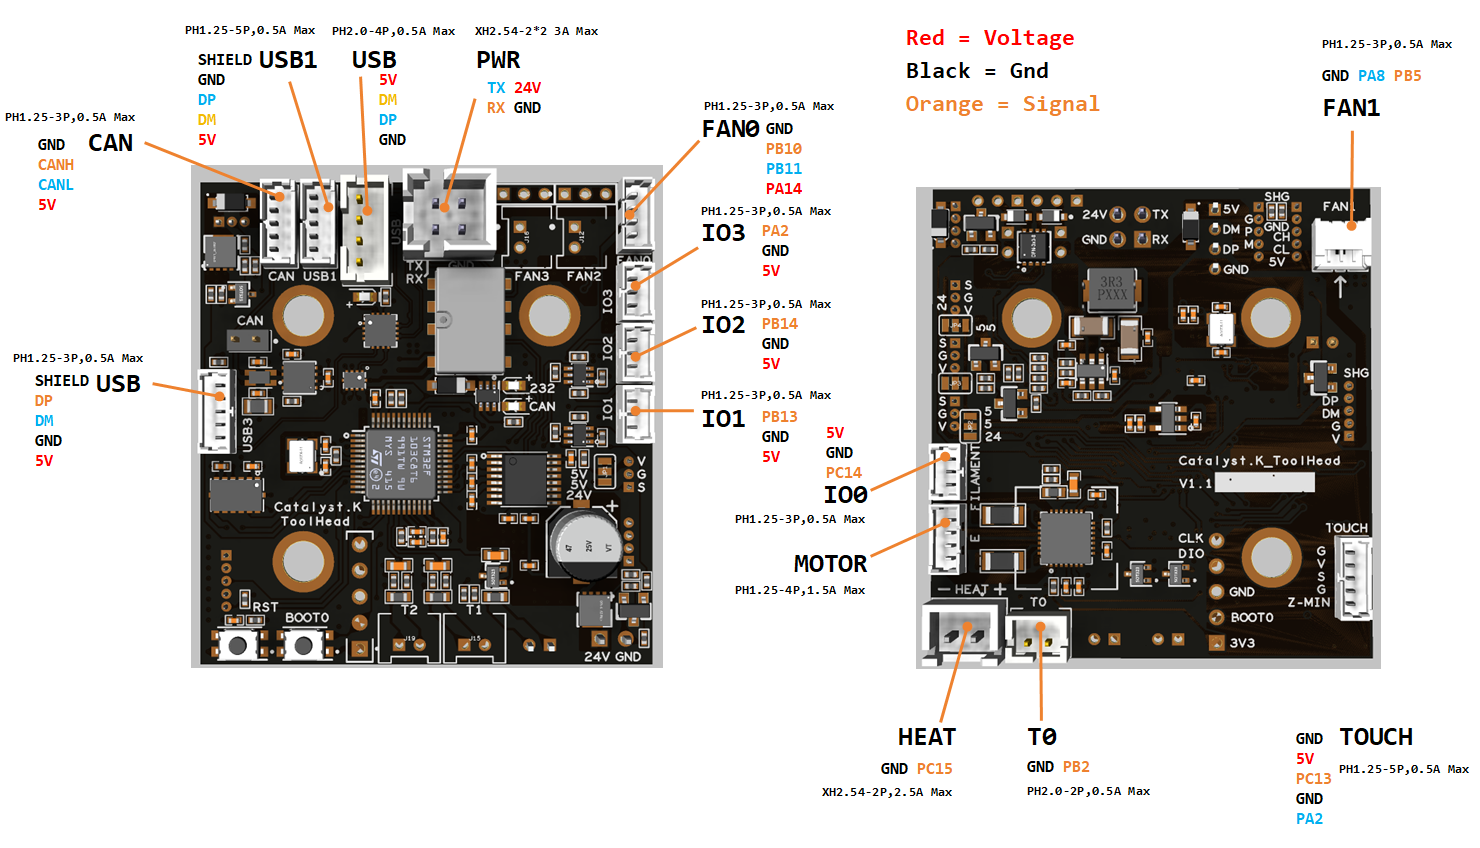
IO.0: PC14
IO.1: PB13
IO.2: PB14
IO.3: PA2

FAN0_PWCTL: PA14
FAN0_PWM: PB10
FAN0_TACH: PB11

FAN1: PB5
FAN1_TACH: PA8

Heat: PC15
Thermistor (4.7k pull up): PB2
Thermistor next to TMC2209 (4.7k pull up) : PB12

Driver_EN: PB9
Driver_DIR: PB6
Driver_STEP: PB7
Driver_UART: PA15
Driver_DIAG: PA13

ADXL345
spi_bus: spi1
adxl345_cs_pin: PA0
adxl345_spi_software_sclk_pin: PA5
adxl345_spi_software_miso_pin: PA6
adxl345_spi_software_mosi_pin: PA7

USB_DM/CAN_RX: PA11
USB_DP/CAN_TX: PA12

Signal_PWM: PC13
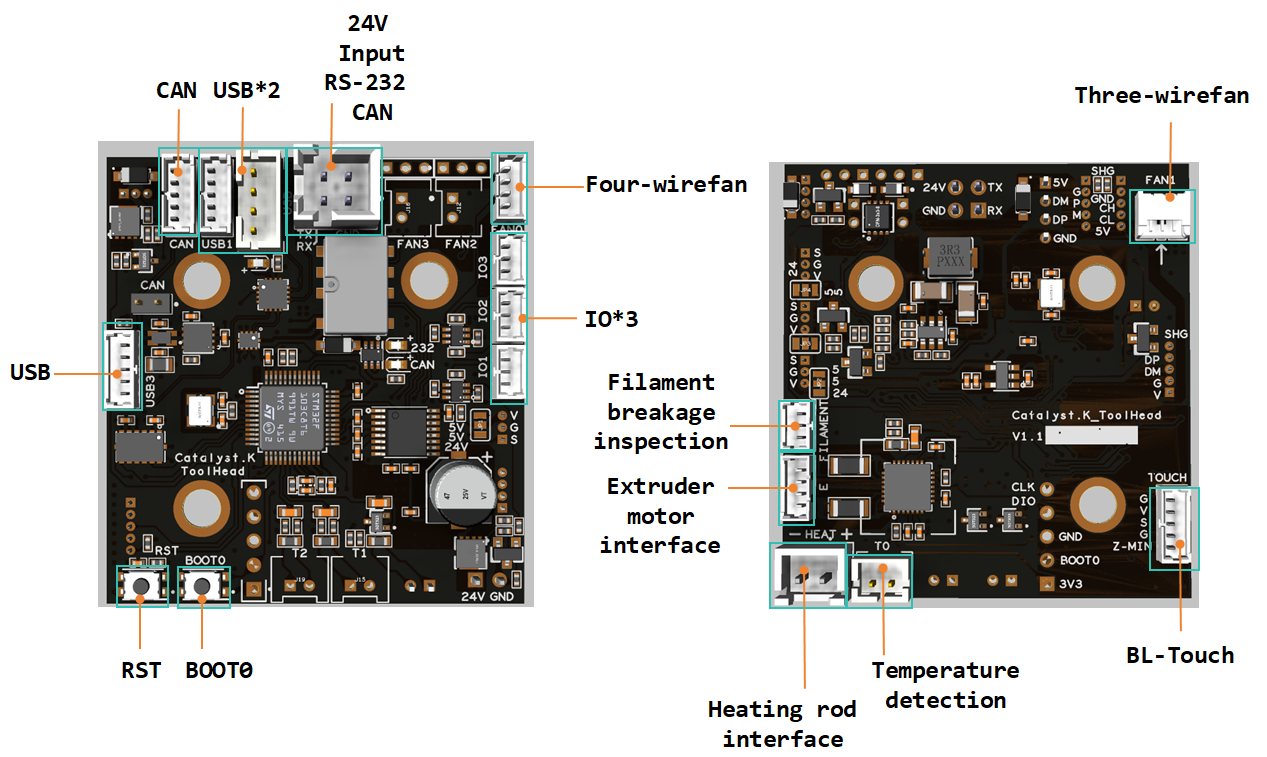
Description Of Connections
Note
Radar function is not currently supported.
| Connector | Pin | Default function | Altermate |
|---|---|---|---|
| Power Input | RS-232 (PA9,PA10) CANBUS (PA11,PA12) |
Power and communication input, RS-232 and CANBUS are optional, which can be switched via an on‑board physical button. | I/O |
| Fan0 | FAN0_PWR: PA14 FAN0_PWM:PB10 FAN0_TACH: PB11 |
Mosfet Output, For 4 pins Fan, voltage = 24V | |
| Fan1 | FAN1: PB5 FAN1_TACH: PA8 |
Mosfet Output, For 3 pins Fan, Default voltage = 24V | |
| IO.0 | PC14 | Digital Input, For endstop, Micro switch or Hall (Pad voltage selector) |
Digital Output |
| IO.1 | PB13 | Digital Input, For endstop, Micro switch or Hall (Pad voltage selector) |
Digital Output |
| IO.2 | PB14 | Digital Input, For endstop, Micro switch or Hall (Pad voltage selector) |
Digital Output |
| IO.3 | PA2 | Digital Input, For endstop, Micro switch or Hall (Pad voltage selector) |
Digital Output |
| TOUCH | PWM:PC13 Z-MIN:PA2 |
5V Digital Output, Digital Input, For Z probe, Proximity switch or Klicky, etc. (Pad voltage selector) |
Digital Input |
| T0 | PB2 | ADC input, 4.7K pull-up, temperature measure | Analog signal Input |
| HEAT | PC15 | Mosfet Output, Heating rod control, 2.5A Max | |
| MOTOR | For two-phase stepper motor,24V | ||
| USB1, USB3 | Connected to the CH334P HUB chip, up to 4 USB2.0 devices (USB/USB1/MCU/USB3) |
LED Indications
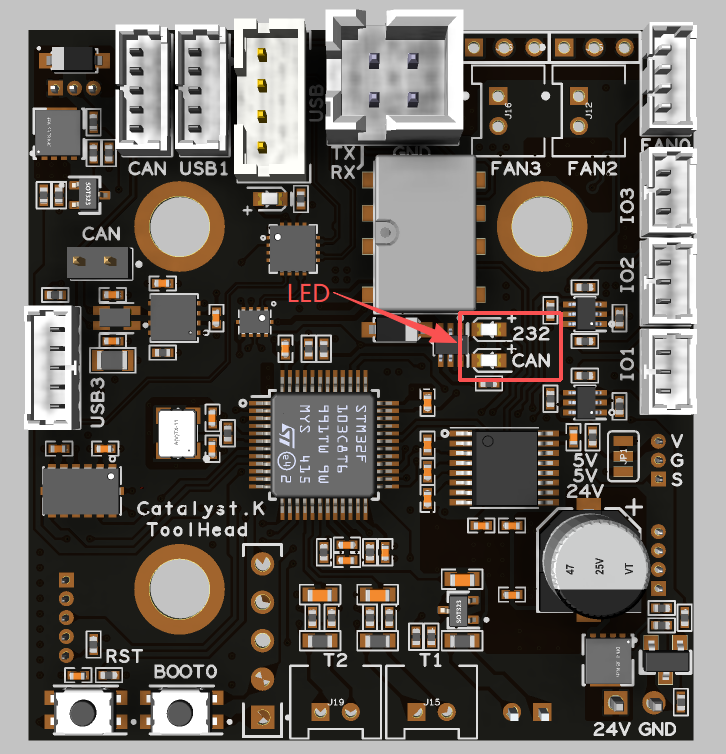
When in DFU mode, or after flashing firmware for USB/Serial mode, the green led turns on; after flashing firmware for CAN mode, the red led turns on.
Connection
Simply connect our motherboard (CATALYST.K) to the Raspberry Pi's header power port and USB port using a power cable and data cable (USB to Type-C), respectively, as shown in the diagram below. No additional power supply is required for the Raspberry Pi, as our motherboard provides 5V@6A power output—more than sufficient to ensure the Raspberry Pi operates normally.
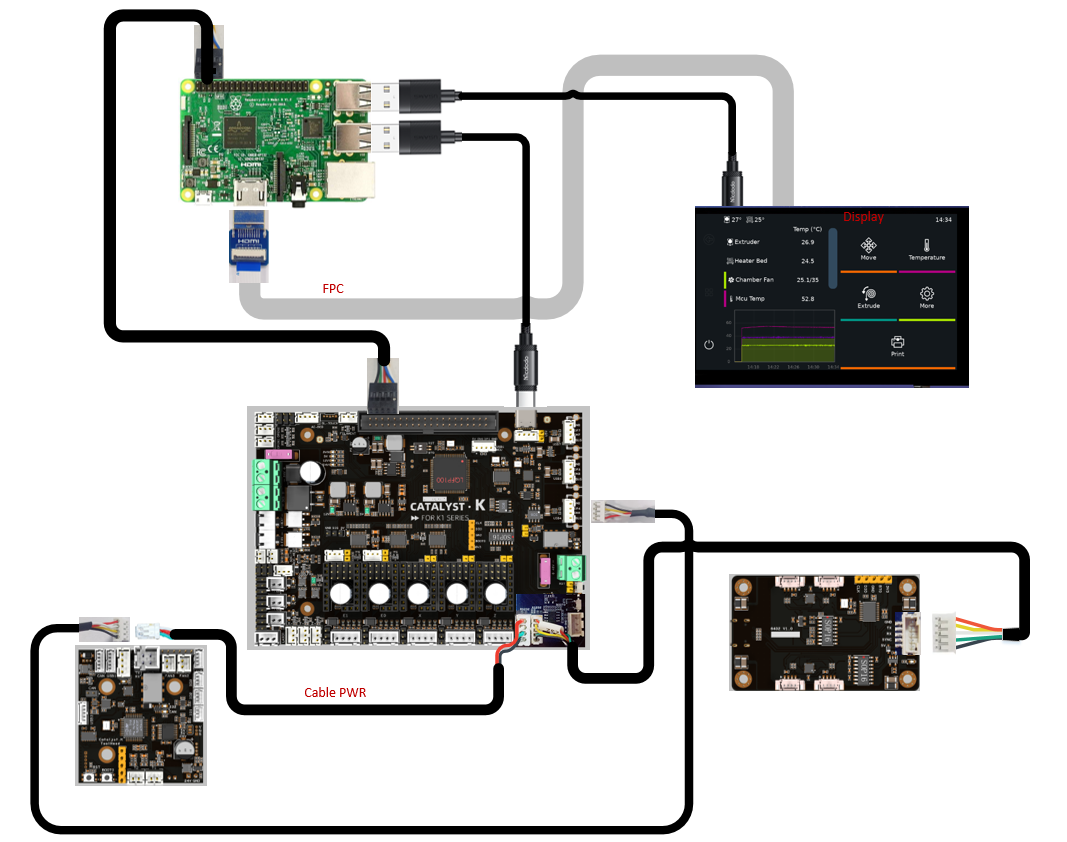
USB Communication Mode
- Connect the USB connector on the Raspberry pi to the connector on the main board (CATALYST.K)
- Connect the RS-232 connector on the main board (CATALYST.K) to the power connector on the tool board (Catalyst.K ToolHead)
- Connect the USB connector on the main board (CATALYST.K) to the connector on the tool board (Catalyst.K ToolHead).
- Connect the motherboard and the leveling board using the 5-pin cable.
- Please refer to https://github.com/FYSETC/Catalyst.K_Kit/tree/main/V1.1 for Raspberry Pi power and display wiring.
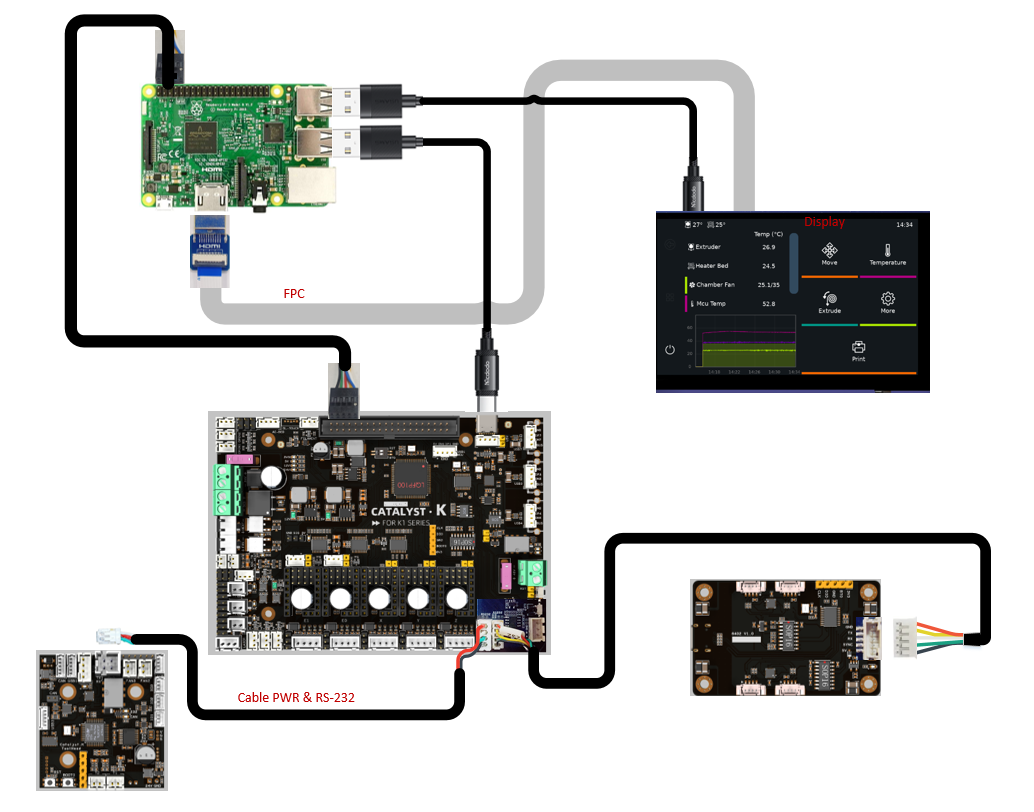
Serial Communication Mode (Recommended)
- Connect the USB connector on the Raspberry pi to the connector on the main board (CATALYST.K)(J1) on the tool board (Catalyst.K ToolHead)
- Connect the RS-232 connector on the main board (CATALYST.K) to the power connector on the tool board (Catalyst.K ToolHead)
- Connect the motherboard and the leveling board using the 5-pin cable.
- Please refer to https://github.com/FYSETC/Catalyst.K_Kit/tree/main/V1.1 for Raspberry Pi power and display wiring.
WARNING
- When the Catalyst.K ToolHead is operating in SERIAL mode, Catalyst.K must operate in USB mode.
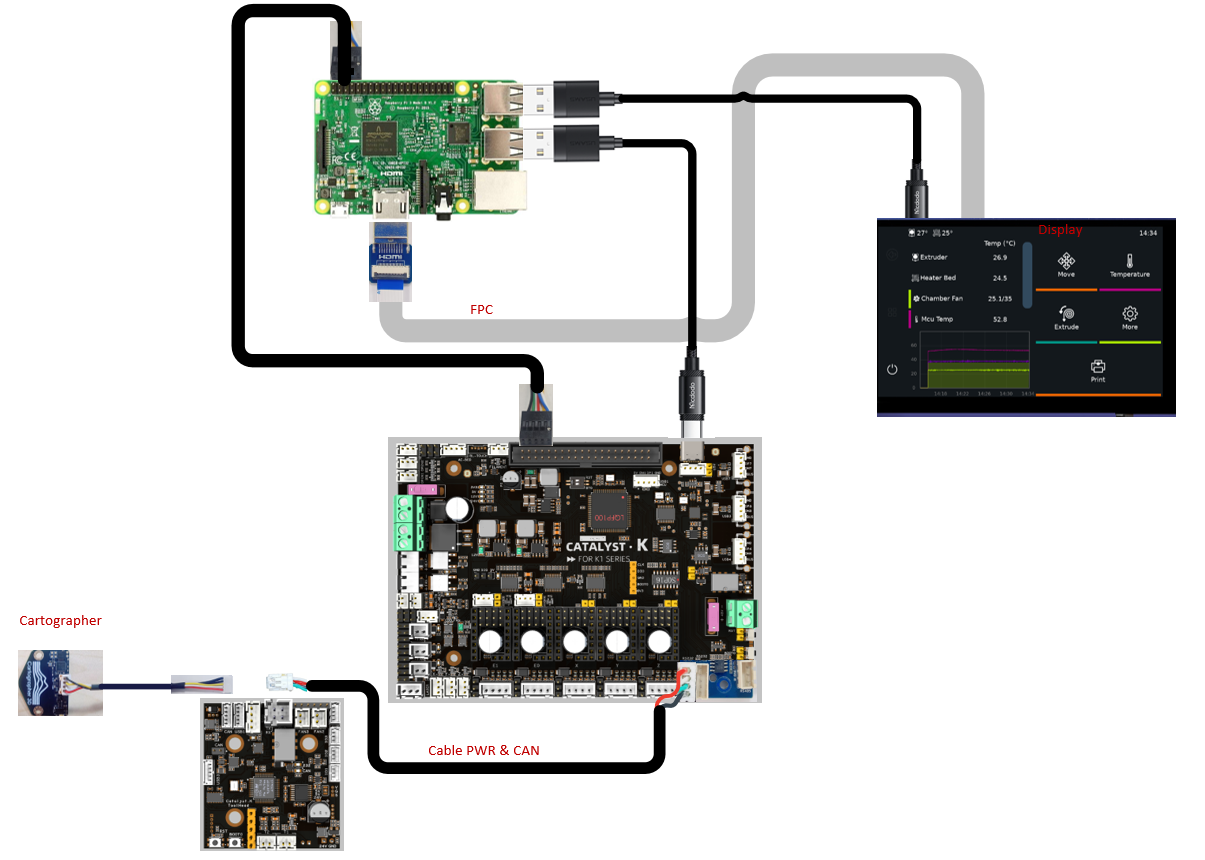
CAN Communication Mode
- Connect the USB connector on the Raspberry pi to the connector on the main board (CATALYST.K)
- Connect the RS-232 connector on the main board (CATALYST.K) to the power connector on the tool board (Catalyst.K ToolHead)
- Connect on the Catalyst.K ToolHead to the Cartographer.
- Please refer to https://github.com/FYSETC/Catalyst.K_Kit/tree/main/V1.1 for Raspberry Pi power and display wiring.
Firmware Guide
Firmware Configuration
Klipper With No Bootloader (Recommend)
Warning
- The host computer (such as a Raspberry Pi) must be connected to Wi-Fi or Ethernet. After obtaining the host computer's IP address using a LAN scanning tool such as Angry IP Scanner, you can then use an SSH tool to login to the host computer.
Login to the host computer using tool such as MobaXterm or PuTTY via SSH, and execute the following command to open the firmware configuration tool.
cd ~/klipper
make menuconfig
The recommended mode is USB mode and the configuration is as follows.
USB
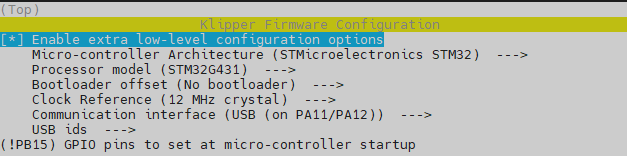
SERIAL (Recommend)

CAN
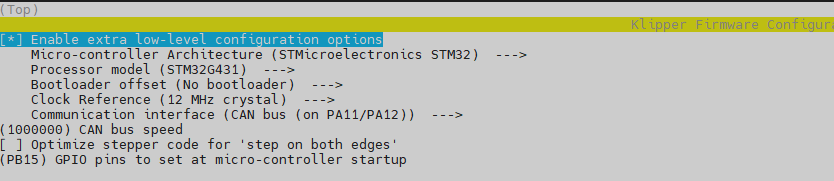
Complete the configuration shown in the reference image , then save the configuration and exit the configuration tool.
Note
If using Katapult, please refer to:
https://github.com/Arksine/katapult?tab=readme-ov-file#uploading-klipper
Firmware Upload
DFU mode
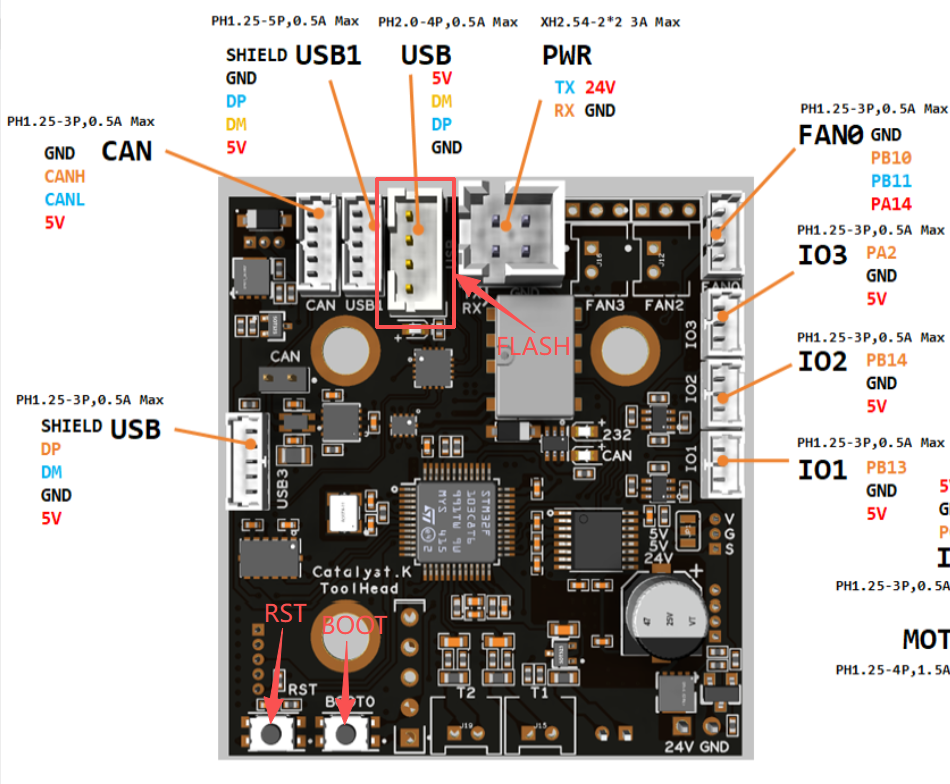
Connect the Raspberry Pi to the toolhead USB port using the provided USB cable.
You need to enter DFU mode before you can compile and burn the firmware. As shown in the figure above,
- press and hold BOOT0,
- press the RESET button for one second,
- release RESET,
- wait for 3 seconds,
- release BOOT0.
Use the command 'lsusb' to check if a DFU device is detected. If it appears, proceed with uploading the firmware. If not, repeat the previous steps.
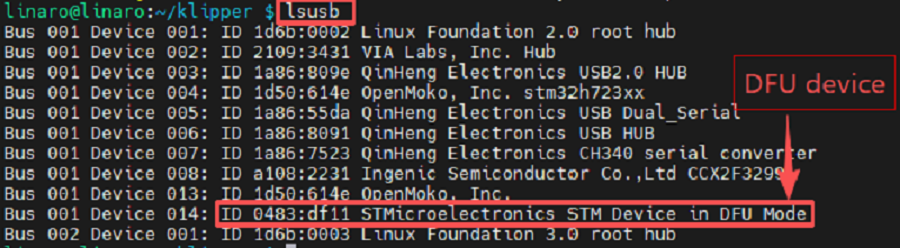
Firmware flash
After the device is in DFU mode, execute the following commands to compile and flash the program.
make flash FLASH_DEVICE=0483:df11After the burning process is complete, it will display "File downloaded successfully".
ID Search
Warning
- If Mainsail or KlipperScreen indicates that it cannot connect to the MCU, you must modify the MCU ID before attempting to reconnect.
-
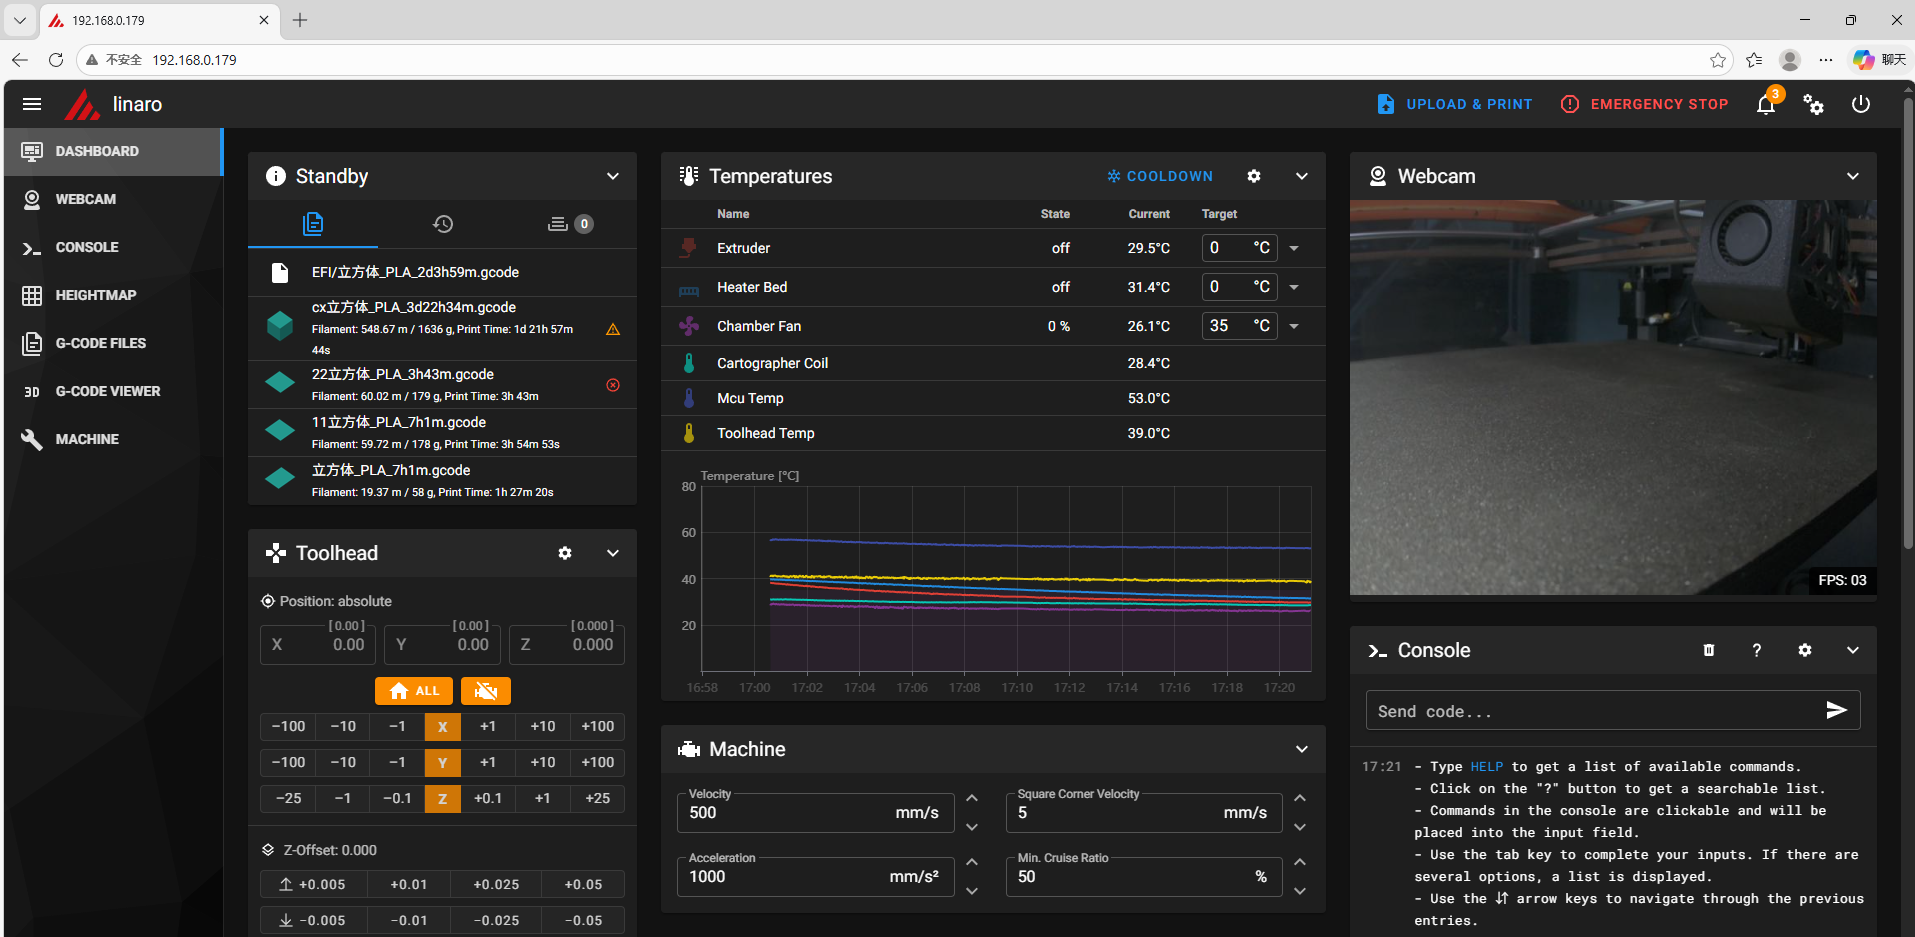
Open your browser, enter the IP address of the host computer in the address bar, for example, my host computer's IP is 192.168.0.179, just enter it and press Enter.
-
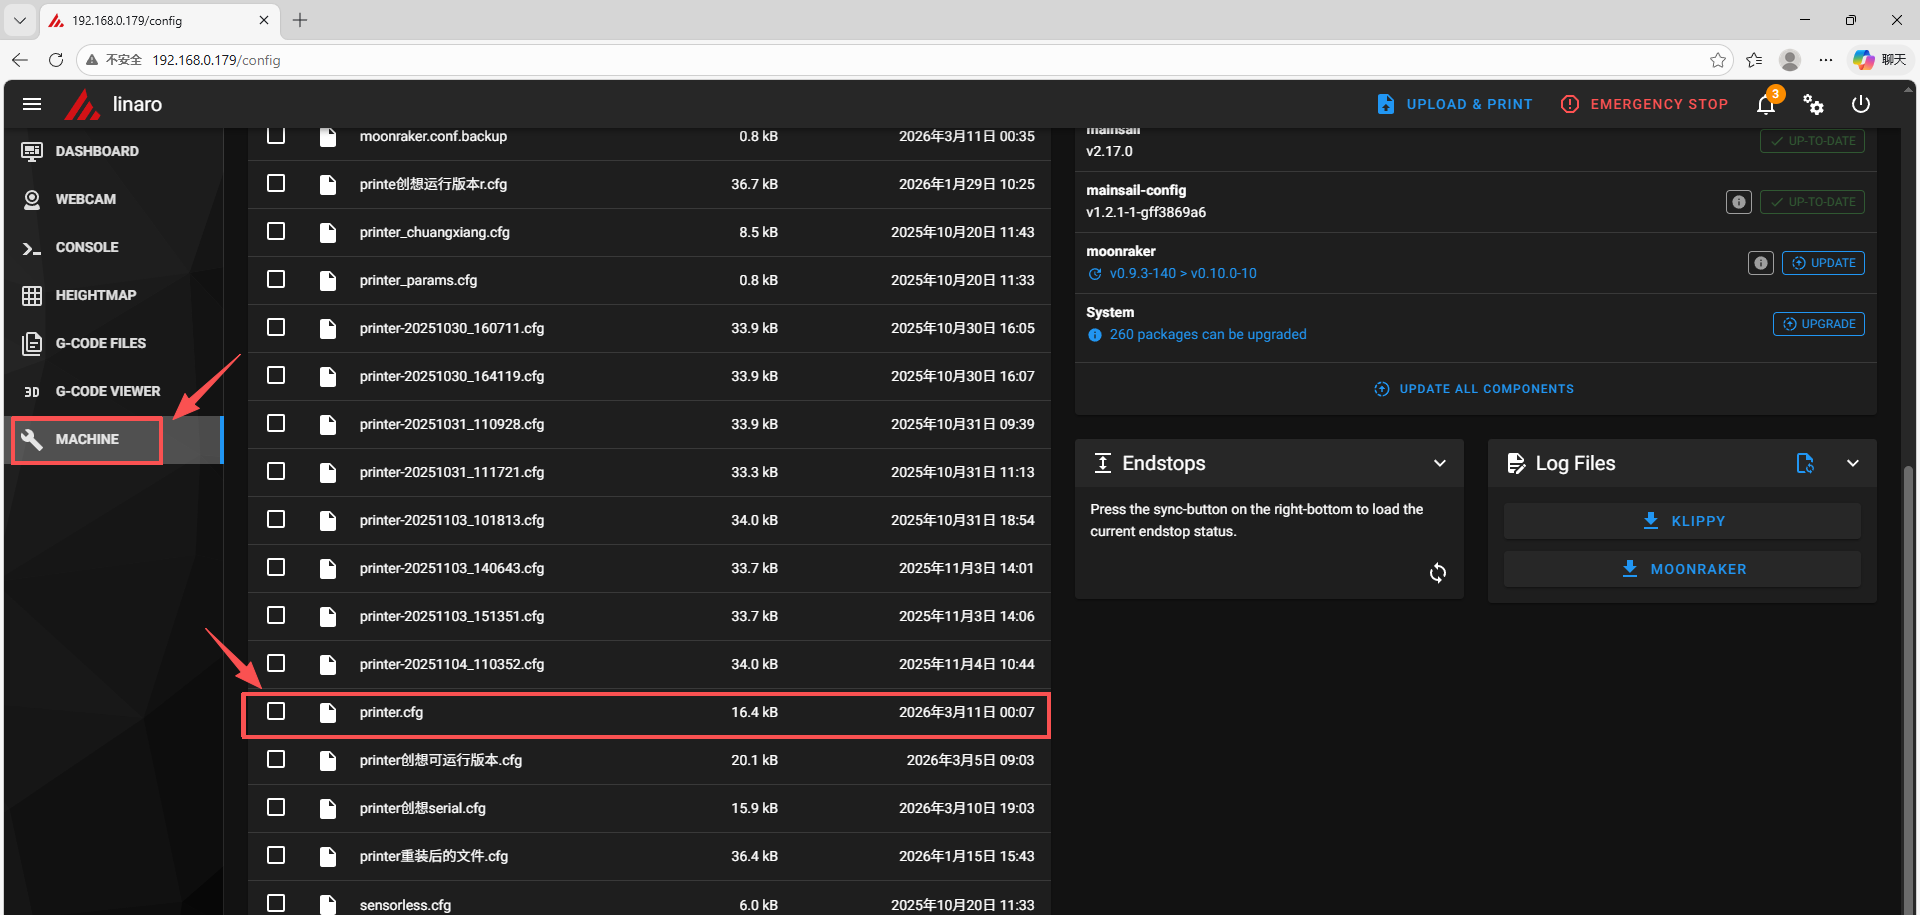
Open the web interface of the host computer, and find "Machine" in the configuration options on the left sidebar. Click to open the printer.cfg file.
-
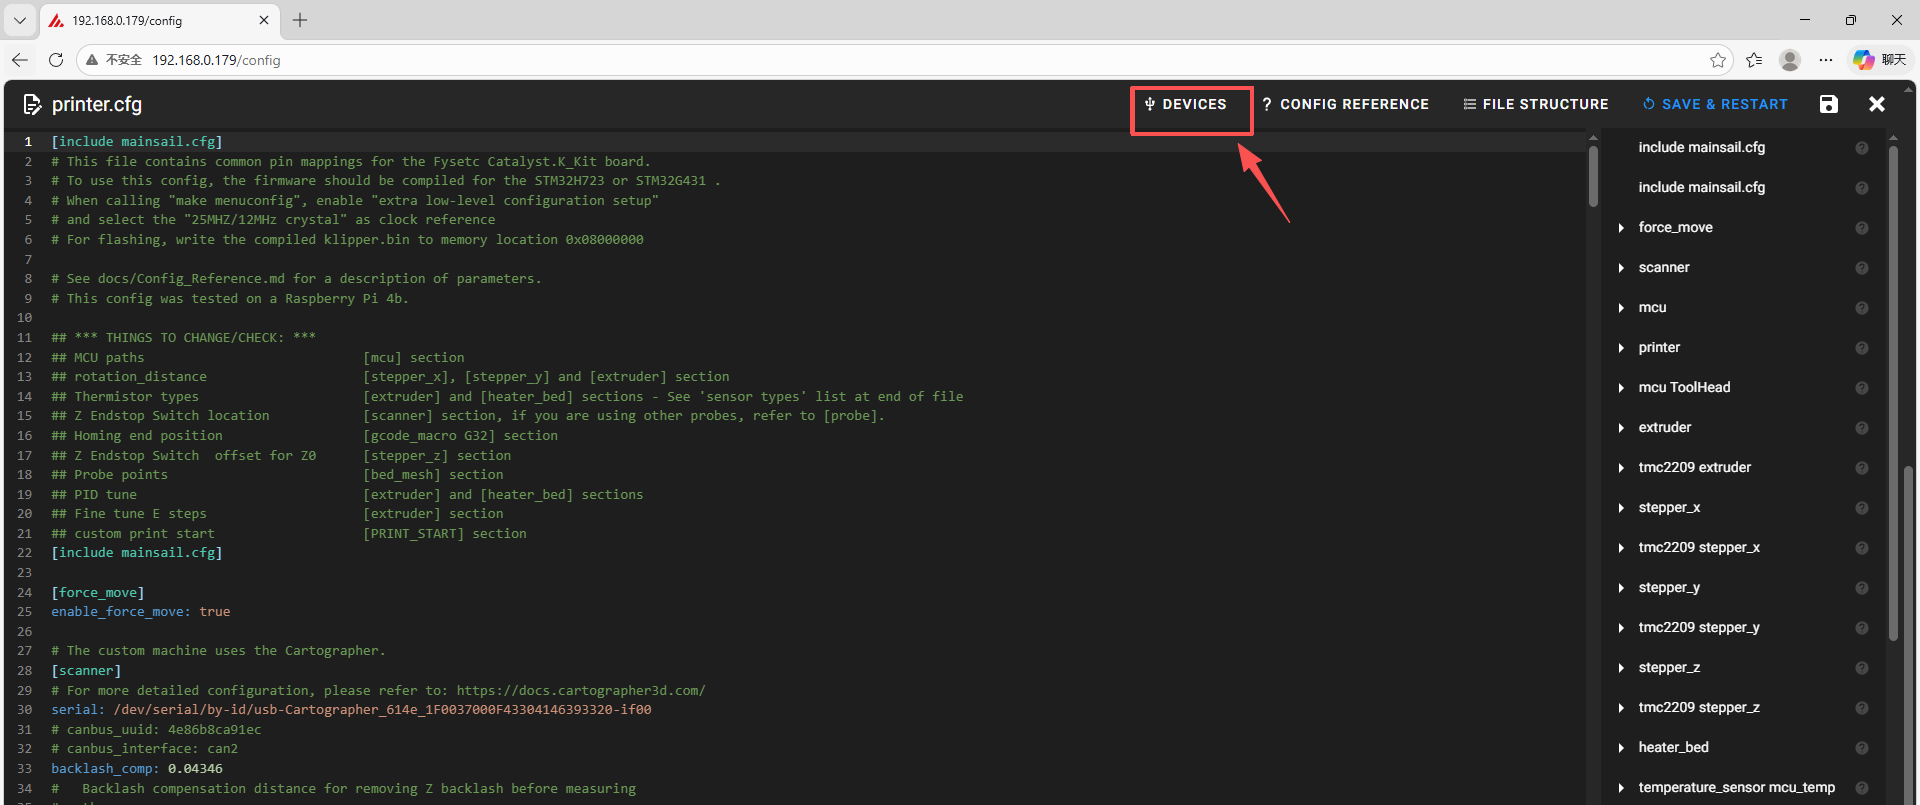
Click the DEVICES button in the upper right corner.
-
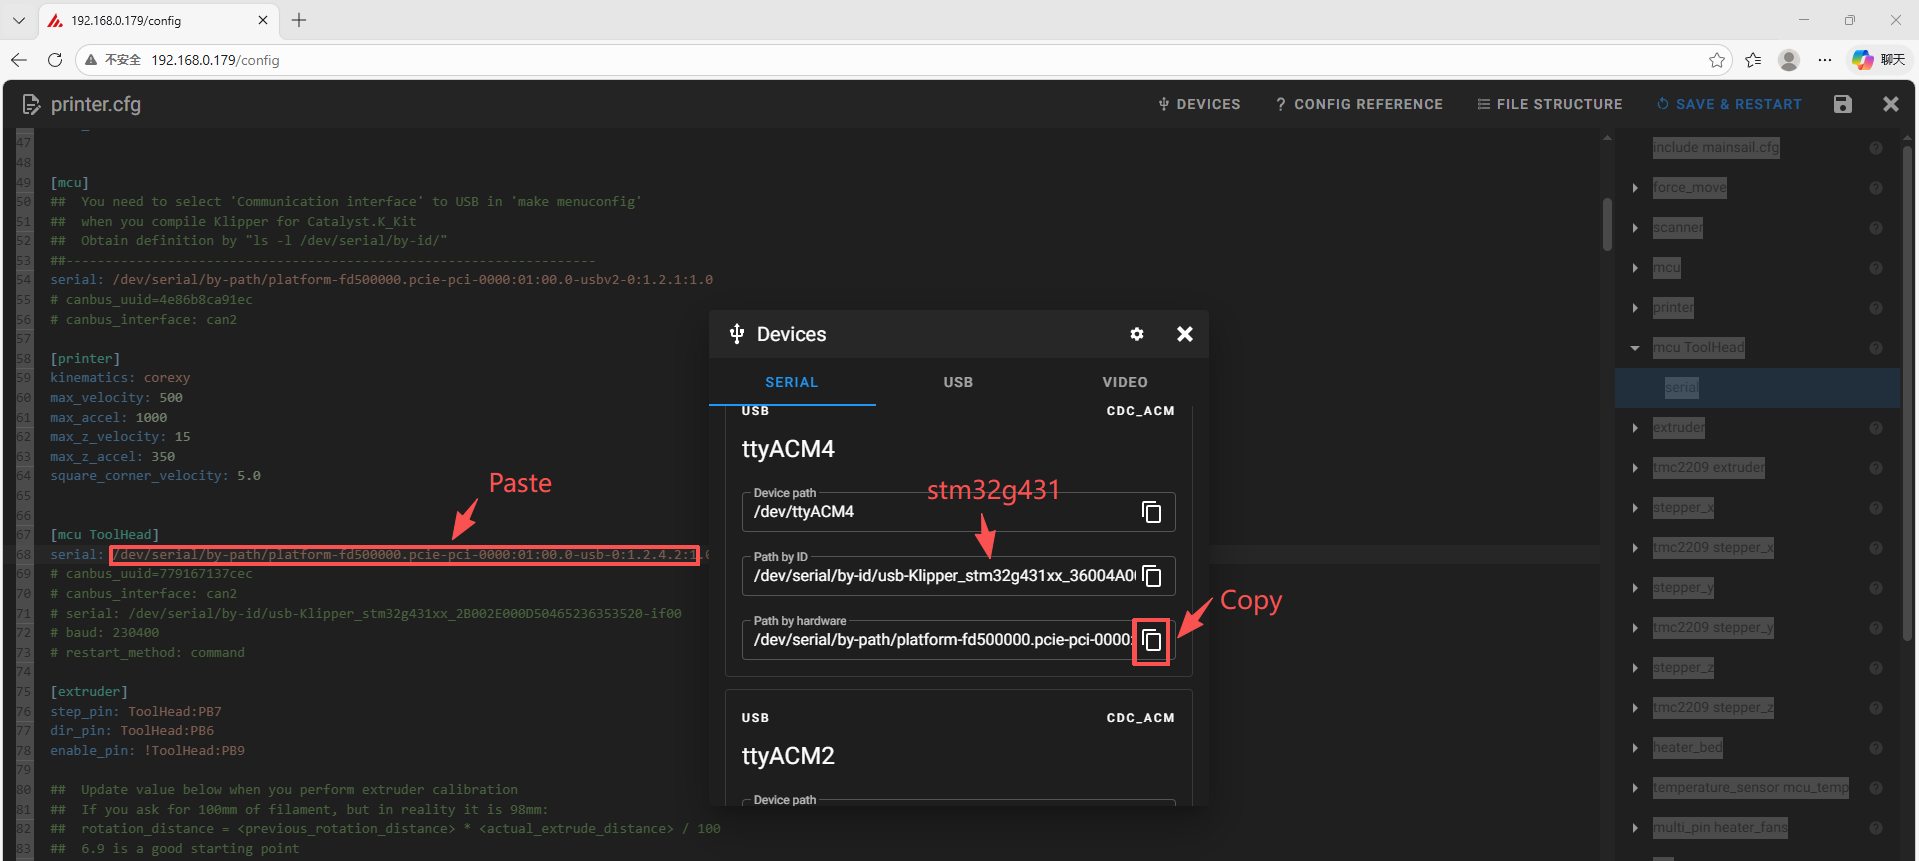
After selecting the communication method, click refresh. Copy the ID by clicking the arrow, then paste it into the [mcu ToolHead] section of printer.cfg.
-
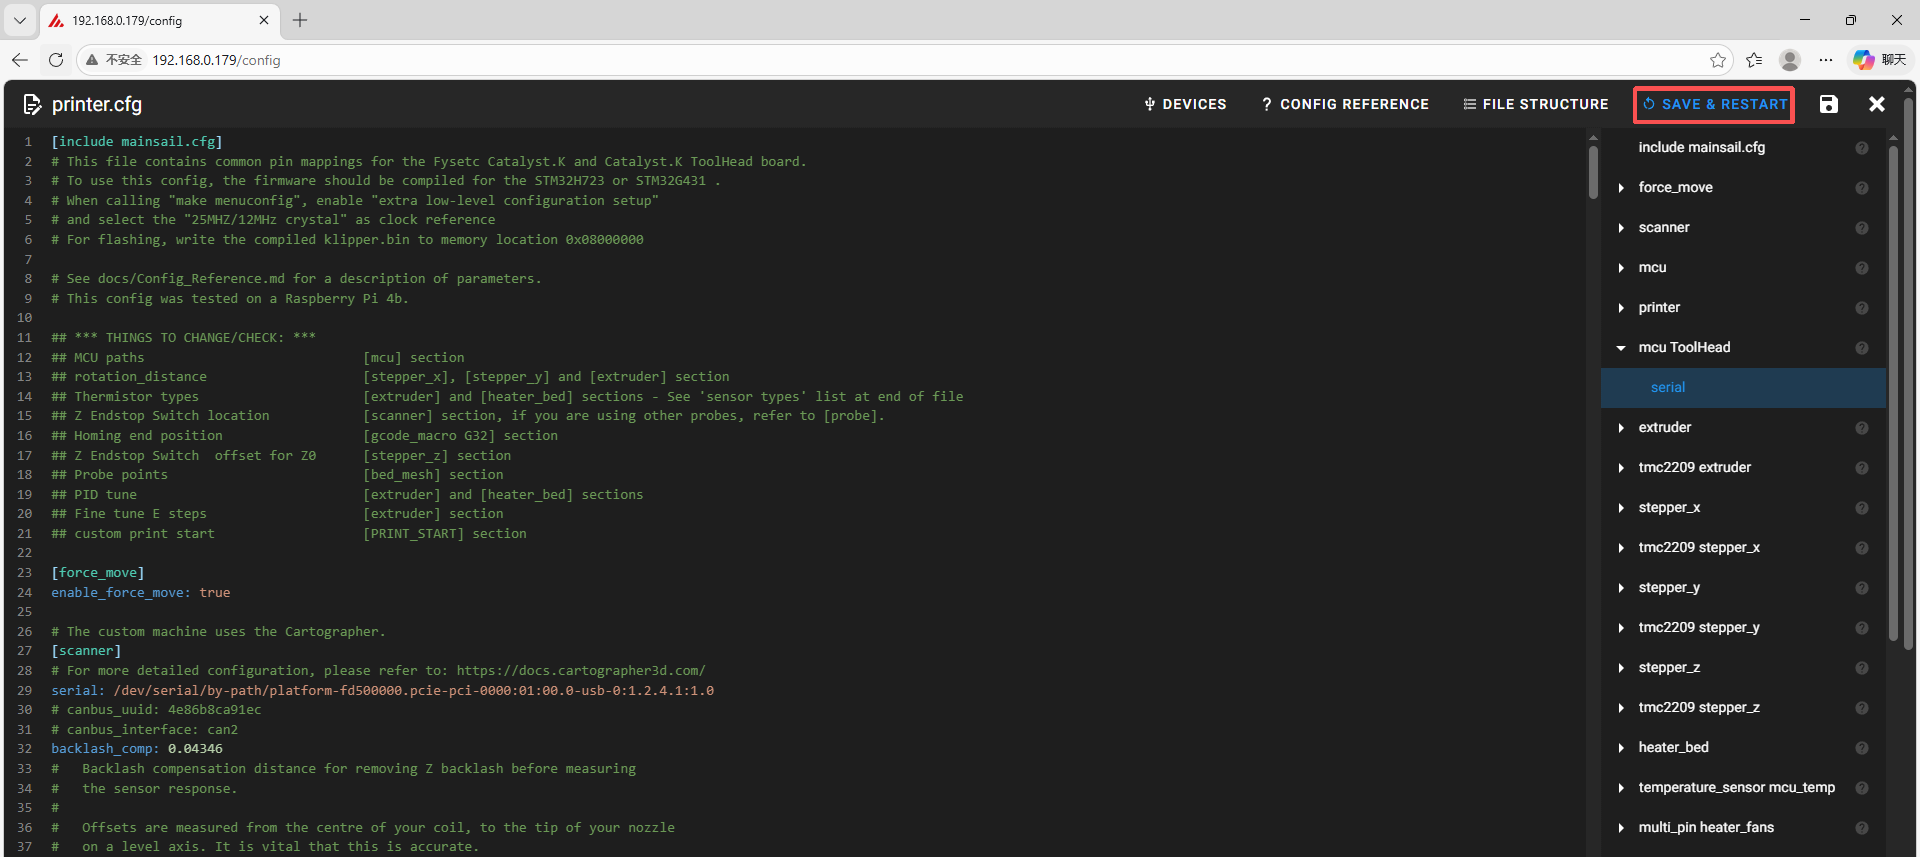
Click the save and restart button in the upper right corner.
Attachments And Other Documents
2D,3D , SCH and config template file, please go to our github:
https://github.com/FYSETC/Catalyst.K_Kit